Mini No-Bake Oreo Cheesecakes: A Delightful Treat for Any Occasion
As the temperatures rise and the sun shines brighter, many of us start seeking out desserts that are not only delicious but also easy to prepare. No-bake desserts have become a go-to option for those warm months, allowing us to satisfy our sweet tooth without having to turn on the oven. One such treat that perfectly fits this bill is the Mini No-Bake Oreo Cheesecake. This delightful dessert combines the rich and creamy texture of cheesecake with the beloved flavor of Oreo cookies, making it a crowd-pleaser for gatherings, parties, or simply a sweet indulgence at home.
Oreo cookies have long been a favorite among dessert enthusiasts, thanks to their unique combination of chocolate and cream. Their versatility allows them to shine in a variety of recipes, from classic milkshakes to elaborate cakes. However, in the realm of no-bake desserts, the Mini No-Bake Oreo Cheesecake stands out as a simple yet impressive option that requires minimal effort and time. Whether you’re hosting a birthday party, celebrating a holiday, or just looking for a fun cooking project to do with family, these mini cheesecakes are sure to impress.
Understanding No-Bake Desserts
No-bake desserts are sweet creations that don’t require any baking. Instead of using heat to achieve the desired texture and flavor, these recipes typically rely on chilling in the refrigerator or freezer to set. This method of dessert preparation offers several benefits, particularly for those who may be short on time or don’t want to deal with the heat of an oven.
One of the major appeals of no-bake cheesecakes, in particular, is their light and airy texture. Without the need for baking, the ingredients maintain a creamy consistency that is both rich and refreshing. Additionally, the ease of preparation makes these desserts perfect for novice bakers or anyone who wants to whip up something delicious without the hassle of traditional baking.
Cheesecakes themselves are beloved around the world, with various cultural interpretations and flavors. From the classic New York-style cheesecake to fruit-topped versions popular in Europe, this dessert has evolved to include countless variations. The Mini No-Bake Oreo Cheesecake is a delightful twist on this classic, providing a familiar yet innovative take that highlights the iconic taste of Oreo cookies.
Ingredients Overview
Before diving into the preparation of these mini cheesecakes, it’s essential to gather all the necessary ingredients. The beauty of this recipe lies in its simplicity, with a handful of components that work together harmoniously to create a delicious treat. Here’s what you’ll need:
– Oreo Cookies: The star of the show, Oreos provide both the base and flavor for your mini cheesecakes. Their chocolatey crunch pairs perfectly with the creamy filling.
– Unsalted Butter: Used to bind the crushed Oreo cookies together, butter adds richness to the crust while ensuring it holds its shape.
– Cream Cheese: The main component of the cheesecake filling, cream cheese gives the dessert its signature creamy texture and tangy flavor.
– Granulated Sugar and Powdered Sugar: Both types of sugar are essential for sweetness. Granulated sugar adds a bit of bulk, while powdered sugar helps achieve a smooth and creamy filling.
– Heavy Whipping Cream: This ingredient introduces lightness and creaminess to the cheesecake. When whipped, it creates a fluffy texture that enhances the overall experience.
– Vanilla Extract: A splash of vanilla extract elevates the flavor profile, adding a warm and inviting aroma that complements the other ingredients.
– Optional Ingredients: For added flair, you can include chocolate syrup for drizzling on top and crushed Oreos for garnish. These optional ingredients can take your mini cheesecakes from delicious to decadent.
Step-by-Step Instructions
Preparing the Cookie Crust
To begin your mini cheesecake adventure, the first step is to create the cookie crust. Start by crushing the Oreo cookies. You can do this by placing them in a food processor for a fine crumb or putting them in a resealable plastic bag and using a rolling pin. Aim for a texture that resembles fine sand, as this will ensure that the crust holds together well once formed.
Once your cookies are crushed, transfer them to a mixing bowl and blend in the melted unsalted butter. The butter is the magic ingredient that binds the crumbs together, so it’s crucial to mix thoroughly until all the crumbs are evenly coated. The mixture should hold together when pressed between your fingers but still be crumbly enough to form a crust.
Forming the Bases
Next, it’s time to form the bases for your mini cheesecakes. Line a muffin tin with cupcake liners or lightly grease it with cooking spray to prevent sticking. Using a tablespoon or cookie scoop, distribute the crumb mixture evenly among the muffin cups. Make sure to press down firmly to create a sturdy foundation for your cheesecakes. The more compact the crust, the better it will hold up when you’re ready to serve.
After you’ve pressed the crust mixture into each cup, place the muffin tin in the refrigerator to chill while you prepare the cheesecake filling. This step allows the crust to firm up and ensures that it maintains its shape when you add the filling.
Making the Cheesecake Filling
With the crust chilling, it’s time to turn your attention to the cheesecake filling. Start by beating the cream cheese in a large mixing bowl until it’s smooth and creamy. This step is crucial, as it ensures there are no lumps in your filling. Gradually add in the granulated sugar and powdered sugar, mixing until well combined. The sugars will not only sweeten the filling but also contribute to its creamy texture.
Next, in a separate bowl, whip the heavy cream until stiff peaks form. This step requires a bit of patience but is essential for creating that light and airy texture that makes no-bake cheesecakes so appealing. Once your cream is whipped, gently fold it into the cream cheese mixture. Be careful not to deflate the whipped cream; the goal is to incorporate it evenly while retaining that fluffiness.
Finally, add the vanilla extract to the mixture and fold until combined. This simple addition will enhance the flavor of your cheesecake filling, making it irresistibly delicious.
With the crust prepared and the filling ready, you’re just a few steps away from enjoying your Mini No-Bake Oreo Cheesecakes. Store the filling in the refrigerator while you prepare to assemble your mini treats, ensuring that everything stays chilled and ready for the final touch.
{{image_2}}
Creating desserts that are both delicious and easy to prepare can be a rewarding challenge, and Mini No-Bake Oreo Cheesecakes fit the bill perfectly. With a creamy, rich filling and a delightful cookie crust, these mini cheesecakes are sure to impress your family and friends. In this section, we will guide you through the detailed instructions for preparing the cheesecake filling, assembling the treats, and serving suggestions that will elevate your dessert game.
Detailed Instructions for Cheesecake Filling
Beating the Cream Cheese
To begin, you’ll want to soften your cream cheese to ensure a smooth texture. Remove it from the refrigerator about 30 minutes before you start, allowing it to come to room temperature. Place the softened cream cheese in a mixing bowl and beat it using an electric mixer on medium speed.
Incorporating Sugar and Vanilla
Once the cream cheese is smooth and lump-free, gradually add in the granulated sugar and pure vanilla extract. Continue to beat the mixture until it is well combined, scraping down the sides of the bowl as necessary. This process is crucial as it helps in achieving that creamy consistency we all love in cheesecakes. The mixture should be smooth and free of any lumps—this is a key step that will ensure your cheesecakes have a velvety mouthfeel.
Whipping the Cream
Next, it’s time to whip the heavy cream. In a separate bowl, pour in the heavy cream and beat it on medium-high speed until soft peaks form. This usually takes about 2-3 minutes. The significance of achieving stiff peaks cannot be overstated; this will give your cheesecake its light and airy texture, making each bite melt in your mouth.
Folding Technique
Once your cream has reached the desired consistency, gently fold it into the cream cheese mixture using a spatula. Be careful not to overmix; you want to maintain the volume of the whipped cream. Use a folding motion, which helps to preserve the airiness of the cream, making your cheesecake light and fluffy.
Adding Extra Oreos
To enhance the flavor and texture of your cheesecakes, chop up a few Oreos into small pieces. The addition of these chopped cookies adds a delightful crunch and intensifies the Oreo flavor throughout the cheesecake. Gently fold the chopped Oreos into your cheesecake mixture, ensuring they are evenly distributed.
Assembling the Cheesecakes
With your cheesecake filling ready, it’s time to assemble the mini cheesecakes. Start by filling each muffin liner with the cheesecake mixture. It’s best to use a piping bag for this step, which allows for a cleaner and more controlled filling process. If you don’t have a piping bag, a zip-top plastic bag with a corner snipped off works well too.
Piping Techniques for a Decorative Finish
To create a beautiful presentation, consider using a star-shaped piping tip to form decorative swirls on top of each cheesecake. This adds an elegant touch and makes your desserts look professional.
Chilling the Cheesecakes
Once filled, the next crucial step is chilling the cheesecakes. Place the muffin tin in the refrigerator for at least 4 hours, or preferably overnight. Chilling is essential for the cheesecakes to set properly, allowing them to achieve that perfect sliceable texture. If you’re in a hurry, at least 2 hours of chilling will help, but for the best results, patience is key.
Serving Suggestions
When you’re ready to serve your mini cheesecakes, carefully remove them from the muffin tin. Gently peel away the liners to reveal perfectly shaped cheesecakes.
Garnishing
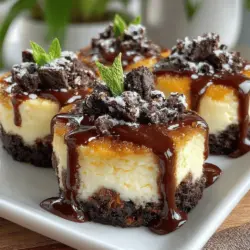
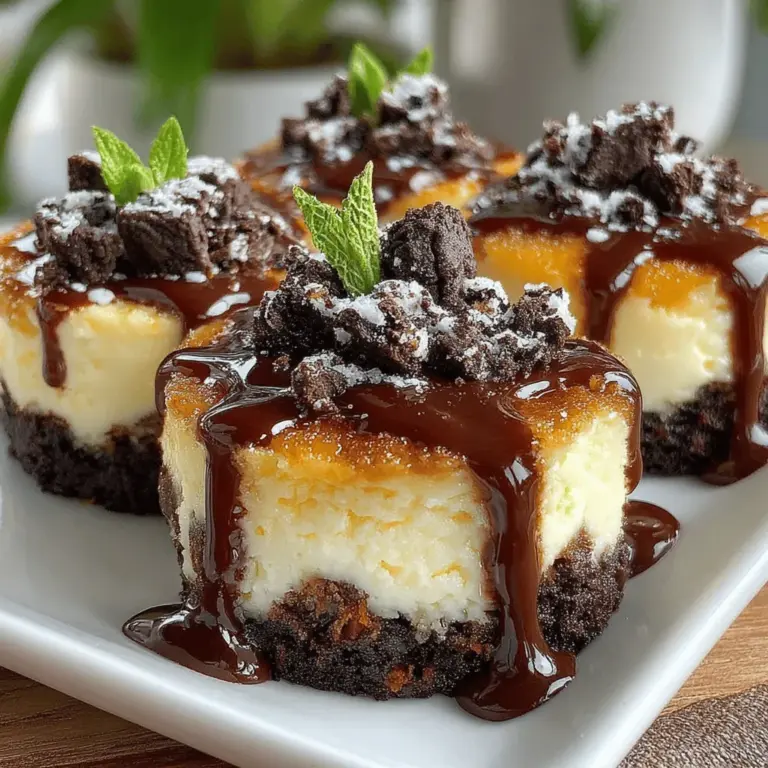
For an added wow factor, garnish each cheesecake with a drizzle of chocolate syrup and a sprinkle of crushed Oreos. Fresh whipped cream on top can also enhance their appeal. You can present them on a beautiful serving platter, or even on individual dessert plates for a more sophisticated touch.
Nutritional Information
Understanding the nutritional aspects of your dessert can help you enjoy it guilt-free. Each Mini No-Bake Oreo Cheesecake contains approximately 180 calories per serving, making it a delightful treat without going overboard.
Dietary Considerations
For those with dietary restrictions, consider using gluten-free Oreos to cater to gluten intolerances. Additionally, if you’re looking to reduce the sugar content, alternative sweeteners can be used without sacrificing flavor.
Popular Variations of No-Bake Cheesecakes
While the classic Oreo flavor is a real crowd-pleaser, there are numerous variations you can explore to keep your dessert repertoire exciting:
– Fruit-Based Cheesecakes: Incorporate fresh fruits such as strawberries, blueberries, or raspberries for a refreshing twist. Pureeing the fruit and folding it into the cream cheese mixture can give you a fruity delight that’s perfect for summer gatherings.
– Chocolate or Caramel Variations: Mix in melted chocolate or caramel sauce into the cheesecake filling for a richer flavor. You can even layer different flavors for a marbled effect.
– Vegan No-Bake Cheesecakes: For a plant-based option, substitute the cream cheese with cashew cream or silken tofu and use a vegan sweetener. This variation is just as creamy and delicious while being suitable for a vegan diet.
Conclusion
In conclusion, Mini No-Bake Oreo Cheesecakes are not only easy to make but also incredibly delicious, making them an ideal dessert for any occasion. Their creamy texture, combined with the crunch of Oreos, creates a delightful treat that everyone will love. Whether you’re hosting a gathering or simply treating yourself, these mini cheesecakes are sure to be a hit.
Don’t hesitate to experiment with different flavors and toppings to make them uniquely yours. No-bake desserts like these are a fantastic way to impress your guests while keeping preparation simple. So, gather your ingredients and whip up a batch of these delightful cheesecakes, and watch them disappear in no time.