
Introduction
As the warm sun begins to shine and summer days stretch longer, nothing quite satisfies like a slice of homemade Strawberry Dream Ice Cream Cake. This delightful dessert is not only a visual treat but also a delicious way to celebrate the best of the season’s offerings. Combining the luscious flavors of strawberry and vanilla ice creams with the crunch of a graham cracker crust, this cake is perfect for summer gatherings, birthday parties, or any celebratory occasion.
The allure of the Strawberry Dream Ice Cream Cake lies in its ability to highlight seasonal ingredients, particularly fresh strawberries. These vibrant berries not only add a natural sweetness but also a pop of color that makes the cake visually stunning. As you prepare this dessert, you’ll appreciate how each component comes together to create a harmonious blend of flavors and textures, ensuring that every bite is a delightful experience.
Understanding the Components of Strawberry Dream Ice Cream Cake
To create the perfect Strawberry Dream Ice Cream Cake, it’s essential to have a solid understanding of its components. Each ingredient plays a crucial role in not only the flavor profile but also the overall presentation of this dessert.
Overview of the Ingredients
The main ingredients you’ll need for this ice cream cake include:
– Strawberry Ice Cream: The star of the show, strawberry ice cream brings a rich, fruity flavor that complements the other elements beautifully.
– Vanilla Ice Cream: This classic flavor serves as a perfect counterpart to strawberry, adding creaminess and a subtle sweetness.
– Fresh Strawberries: Not only do these enhance the flavor, but they also provide a fresh, fruity burst and a stunning visual appeal.
– Whipped Cream: Used for topping and layering, whipped cream adds a light, airy texture that balances the density of the ice cream and crust.
– Graham Crackers: Forming the base of the cake, graham crackers create a deliciously crunchy crust that contrasts with the smooth ice cream.
The Role of Strawberry Ice Cream in the Dessert
Strawberry ice cream is pivotal to the success of this recipe. Its creamy consistency and rich flavors infuse the cake with a fruity essence that’s synonymous with summer. The natural sweetness of strawberries allows for a dessert that’s satisfying without being overly heavy. This ice cream serves as the foundation for the cake’s layers, ensuring that each slice bursts with the taste of fresh strawberries.
Importance of Vanilla Ice Cream as a Complementary Flavor
While strawberry ice cream takes center stage, vanilla ice cream plays a critical supporting role. This classic flavor brings a smooth, creamy texture that helps balance the sweetness of the strawberry ice cream. By including vanilla, you create a contrast that enhances the overall flavor profile of the cake. The creamy notes of vanilla also add depth, allowing the strawberry flavor to shine even brighter.
Benefits of Fresh Strawberries in Enhancing Taste and Presentation
Incorporating fresh strawberries into your ice cream cake not only elevates the taste but also boosts the visual appeal. Fresh strawberries provide a burst of vibrant color and a juicy texture that complements the creaminess of the ice creams. Additionally, using fresh fruit can enhance the cake’s freshness, making it a true celebration of summer flavors. Slicing into a cake adorned with plump, ripe strawberries invites guests to indulge in a refreshing, fruity dessert that feels indulgent yet light.
The Purpose of Whipped Cream in Texture and Flavor
Whipped cream is more than just a decorative topping; it plays a vital role in the cake’s texture and flavor. Its light and airy consistency contrasts beautifully with the denser layers of ice cream and crust, creating a delightful mouthfeel. Whipped cream also adds a subtle sweetness that enhances the overall flavor without overwhelming the palate. When layered between the ice cream and as a final topping, it provides a creamy richness that ties all the components together.
Preparing the Graham Cracker Crust
The foundation of any great ice cream cake lies in its crust, and for the Strawberry Dream Ice Cream Cake, a graham cracker crust is the perfect choice. Its sweet, buttery flavor and crisp texture create a delightful contrast to the smooth layers of ice cream.
Explanation of the Graham Cracker Crust
A graham cracker crust is made from crushed graham crackers mixed with melted butter and sugar, creating a sweet, crumbly base that holds the cake together. This crust is not only easy to prepare but also adds a nostalgic flavor that pairs well with the creamy vanilla and fruity strawberry ice cream.
Comparison of Store-Bought vs. Homemade Crust
When it comes to crusts, you have the option of using either a store-bought graham cracker crust or making your own. While store-bought options can be convenient and save time, a homemade crust allows you to control the flavor and texture, ensuring it perfectly complements your cake. Additionally, making your own crust can be a fun and rewarding experience, allowing you to customize it to your liking.
Step-by-Step Guide on Preparing the Crust
Here’s a simple, step-by-step guide to making the perfect graham cracker crust for your Strawberry Dream Ice Cream Cake:
1. Gather Your Ingredients
To make the graham cracker crust, you will need:
– 1 ¾ cups graham cracker crumbs
– ½ cup unsalted butter, melted
– ¼ cup granulated sugar
– A pinch of salt
2. Mix Ingredients
In a mixing bowl, combine the graham cracker crumbs, melted butter, granulated sugar, and a pinch of salt. Stir until the mixture is well combined and resembles wet sand. The melted butter is crucial as it helps bind the crumbs together.
3. Pressing into the Springform Pan
Once the crust mixture is ready, transfer it to a 9-inch springform pan. Using your fingers or the back of a measuring cup, firmly press the mixture into the bottom and up the sides of the pan. Aim for an even layer to ensure a stable structure for your ice cream layers.
4. Importance of Chilling the Crust
After pressing the crust into the pan, it’s essential to chill it in the refrigerator for at least 30 minutes. Chilling allows the butter to solidify, which will help the crust hold its shape when you add the ice cream layers. A well-chilled crust will provide a satisfying crunch and prevent it from crumbling when sliced.
Layering the Ice Cream
Once your graham cracker crust is prepared and chilled, it’s time to move on to layering the ice cream. This step is crucial for achieving a visually appealing and delicious dessert.
Techniques for Softening Ice Cream to Achieve Perfect Layers
Before you begin layering, you’ll need to soften your ice cream slightly. This can be done by removing it from the freezer and allowing it to sit at room temperature for about 10 to 15 minutes. The goal is to have the ice cream soft enough to spread easily without melting.
Detailed Instructions for Layering Strawberry Ice Cream
1. Add the Strawberry Ice Cream: Begin by spooning the softened strawberry ice cream into the chilled graham cracker crust. Using a spatula, spread the ice cream evenly, ensuring it reaches the edges of the pan for a neat appearance.
2. Smooth the Layer: Once the strawberry layer is in place, smooth it out with the spatula. This step is important for creating a clean separation between the layers.
3. Chill Again: Place the pan back in the freezer for about 30 minutes to allow the strawberry layer to firm up.
Importance of Smoothing the Layers for a Neat Appearance
Smoothing each layer is essential for both aesthetics and taste. A neat appearance not only makes for a more appealing dessert but also ensures that each slice has a balanced distribution of flavors. By taking the time to smooth the layers, you enhance the overall presentation of your Strawberry Dream Ice Cream Cake.
Layering Vanilla Ice Cream: Tips for Achieving a Clean Separation
After the strawberry layer has firmed up, it’s time to add the vanilla ice cream layer. Follow the same technique as with the strawberry layer:
1. Spoon in the Vanilla Ice Cream: Remove the vanilla ice cream from the freezer and let it soften slightly. Once ready, spoon it over the chilled strawberry layer.
2. Spread Evenly: Again, use a spatula to spread the vanilla ice cream evenly over the strawberry layer.
3. Create a Clean Separation: To achieve a clean separation between the two layers, be gentle when spreading the vanilla ice cream. Avoid dragging the spatula through the strawberry layer, as this can create a marbled effect rather than distinct layers.
4. Final Chill: After adding the vanilla layer, return the cake to the freezer for at least 2 hours, or until fully set.
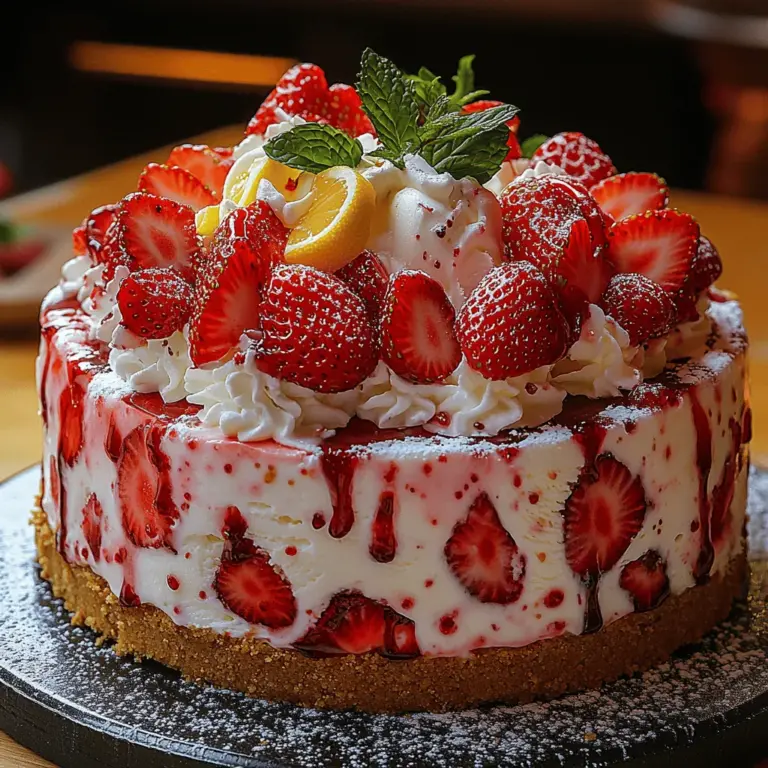
With these steps, you’ll create a Strawberry Dream Ice Cream Cake that’s not only delicious but also visually stunning, making it the perfect centerpiece for your summer gatherings. Stay tuned for the next part of this article, where we will explore the final touches and presentation of this delightful dessert.
{{image_2}}
Time Recommendations for Chilling Between Layers
Chilling is a crucial step in the creation of your Strawberry Dream Ice Cream Cake, ensuring that each layer sets properly for optimal texture and flavor. After preparing the ice cream layers, it’s recommended to chill each layer in the freezer for at least 2-3 hours before adding the next. This allows the ice cream to firm up sufficiently, preventing the layers from mixing and ensuring that your cake holds its shape when served. For the best results, consider leaving the assembled cake in the freezer for a minimum of 4 hours, or overnight if time permits. This extra chilling will enhance the cake’s stability and ensure that it slices beautifully.
Creating the Strawberry Topping
The star of our dessert is undoubtedly the strawberry topping, which elevates the flavor and provides a beautiful finish. Macerating strawberries is a simple yet effective technique that enhances their natural sweetness and flavor. This process involves sprinkling fresh strawberries with sugar and lemon juice, allowing them to sit for a while to draw out their juices.
Benefits of Sugar and Lemon Juice in Enhancing Strawberry Flavor
Sugar plays a dual role in macerating strawberries: it sweetens them while also drawing out their juices, creating a syrupy mixture that coats the fruit. Lemon juice adds a bright acidity that balances the sweetness and amplifies the strawberries’ natural flavor. Together, these ingredients create a mouthwatering topping that complements the creamy layers of the ice cream cake.
Step-by-Step Instructions for Preparing the Topping
1. Select Your Strawberries: Start with fresh, ripe strawberries. Look for firm berries that are bright red and free from blemishes.
2. Wash and Slice: Gently wash the strawberries under cold water and pat them dry with a paper towel. Remove the green tops and slice the strawberries into quarters or halves, depending on their size.
3. Mix with Sugar and Lemon Juice: In a medium bowl, combine the sliced strawberries with 1-2 tablespoons of granulated sugar (adjust to taste) and 1 tablespoon of freshly squeezed lemon juice.
4. Macerate: Stir the mixture gently to coat the strawberries. Cover the bowl with plastic wrap and let it sit at room temperature for about 30 minutes. This resting period allows the strawberries to release their juices, creating a delicious syrup that will soak into the cake layers.
Importance of Letting the Strawberries Sit to Release Juices
Allowing the strawberries to macerate is essential for maximizing flavor and achieving the perfect syrupy consistency. As the sugar interacts with the strawberries, it draws out moisture, resulting in a luscious topping that will not only taste fantastic but also provide a beautiful visual contrast to the white ice cream layers.
Assembling the Cake
Once your ice cream layers are set and your strawberry topping is prepared, it’s time to assemble the cake. This stage requires a bit of care to ensure that the structure remains intact and visually appealing.
Detailed Process for Removing the Cake from the Springform Pan
1. Loosen the Edges: Carefully run a thin knife around the edges of the springform pan to loosen the ice cream layers. This step helps prevent any sticking when you release the sides of the pan.
2. Release the Springform: Gently unclip the sides of the springform pan and lift them away from the cake. If any ice cream sticks to the sides, use the knife to carefully detach it.
3. Transfer to a Serving Plate: Using a large spatula or a cake lifter, carefully transfer the cake to a serving plate. If the bottom of the cake is still frozen, it may help to let it sit at room temperature for about 5 minutes to soften slightly.
Instructions for Spreading Whipped Cream Evenly on Top
1. Prepare the Whipped Cream: In a mixing bowl, beat 1 cup of heavy cream with 2 tablespoons of powdered sugar until soft peaks form. If desired, you can add a splash of vanilla extract for extra flavor.
2. Spread the Whipped Cream: Using a spatula, spread a generous layer of whipped cream evenly over the top of the ice cream layers. The whipped cream will act as a canvas for your strawberry topping and add a delightful lightness to the cake.
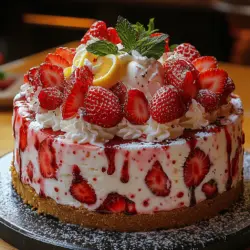
Layering the Macerated Strawberries for Visual Appeal
1. Add the Strawberries: Spoon the macerated strawberries over the whipped cream, allowing some of the syrup to drizzle down the sides of the cake. Arrange the strawberries in an even layer, ensuring that each slice will have a generous portion.
2. Create Height and Texture: For added visual impact, consider layering some of the larger strawberry pieces on top, creating a stunning presentation that showcases the vibrant red of the berries against the white cream.
Tips for Maintaining the Integrity of the Ice Cream Layers During Assembly
– Work Quickly: Ice cream melts quickly, so try to assemble your cake as swiftly as possible to prevent the layers from becoming too soft.
– Use a Chilled Spatula: If your spatula gets warm, run it under cold water to help maintain the integrity of the ice cream while spreading the whipped cream and strawberries.
– Freeze Between Steps: If you notice the ice cream becoming too soft during assembly, pop the cake back in the freezer for a few minutes to firm up before continuing.
Final Chilling and Serving Suggestions
After assembling your Strawberry Dream Ice Cream Cake, it’s crucial to chill it one final time before serving. This step ensures that the whipped cream and strawberries set nicely against the ice cream layers.
Importance of Chilling the Assembled Cake Before Serving
Chilling the cake for at least an additional 2 hours in the freezer allows the whipped cream to firm up and the flavors to meld beautifully. It also ensures that the strawberries remain fresh and vibrant when served.
Techniques for Slicing the Cake Cleanly
When it comes time to serve your cake, a clean slice is essential for presentation. Here are some techniques to achieve that perfect cut:
1. Use a Warm Knife: Dip a sharp knife in hot water and wipe it dry before slicing. The heat will help cut through the ice cream more smoothly.
2. Wipe Between Slices: After each cut, wipe the knife clean to ensure that subsequent slices remain neat and tidy.
3. Serve Immediately: Ice cream cakes are best enjoyed fresh, so cut and serve immediately after slicing.
Presentation Ideas, Including Garnishing with Fresh Mint Leaves
To make your dessert even more appealing, consider the following presentation ideas:
– Garnish with Fresh Mint: Add a sprig of fresh mint on top of each slice for a pop of color and a hint of freshness.
– Drizzle with Extra Syrup: If you have any leftover macerated strawberry syrup, drizzle it over each slice for added flavor and visual appeal.
– Serve with Additional Strawberries: Serve alongside extra fresh strawberries for a burst of color and flavor on the plate.
Nutritional Insights
Understanding the nutritional content of your Strawberry Dream Ice Cream Cake can help you enjoy it more mindfully.
1. Breakdown of the Nutritional Content: A typical serving of this cake contains approximately 300-400 calories, depending on the specific ingredients used and portion size. The cake is rich in carbohydrates from the cake layers and sugar, while also providing a source of fat from the cream and ice cream.
2. Discussion on Calorie Counts and Serving Size: When serving, keep in mind that a little goes a long way. A modest slice is often satisfying due to the cake’s rich flavors and textures.
3. Consideration of Dietary Modifications: If you’re looking to modify the recipe for dietary preferences, consider using low-sugar or sugar-free alternatives for the cake and the strawberry topping. Dairy-free ice cream can also be substituted for the cream to make this a delightful treat for those with lactose sensitivities.
Conclusion
The Strawberry Dream Ice Cream Cake is not just a dessert; it’s a celebration of flavors, textures, and the joy of sharing something special with loved ones. Its refreshing qualities make it an excellent choice for summer gatherings, birthday parties, or simply as a delightful treat after dinner.
Creating this cake not only brings together the delightful combination of strawberries and cream but also allows for endless variations and personal touches. Whether you choose to experiment with different fruits, add a layer of chocolate ganache, or adjust the sweetness, the possibilities are as limitless as your imagination.
As you embark on your culinary journey with this recipe, remember the joy of creating something beautiful and delicious to share. Embrace the art of baking and don’t hesitate to put your unique spin on this delightful ice cream cake. Happy baking!