Introduction
There’s something undeniably comforting about homemade rolls, particularly when they emerge from the oven, golden and steaming. The aroma of freshly baked bread wafts through the kitchen, inviting everyone to gather around the table. Buttery garlic herb rolls take this experience to a whole new level, transforming simple bread into an extraordinary culinary delight. The combination of rich butter, fragrant garlic, and a medley of fresh herbs creates a flavor profile that elevates these rolls beyond your average dinner bread, making them a perfect accompaniment to any meal.
The appeal of these rolls lies not just in their delicious taste, but also in their texture. When baked to perfection, buttery garlic herb rolls have a soft, pillowy interior complemented by a slightly crispy exterior. As you break them apart, the rich aroma of garlic and herbs fills the air, enticing everyone to take a bite. Whether served alongside a hearty soup, a luxurious pasta dish, or on their own with a bit of extra butter, these rolls are sure to impress.
In this recipe, you can expect a delightful balance of flavors, with the garlic providing a robust kick and the fresh herbs adding brightness. As you embark on this culinary adventure, prepare to fill your kitchen with the irresistible scent of baking bread — a scent that promises warmth and comfort in every bite.
Understanding the Ingredients
To create the perfect buttery garlic herb rolls, understanding the role of each ingredient is crucial. Let’s explore the key components that make these rolls not just delicious, but truly exceptional.
All-Purpose Flour
All-purpose flour serves as the foundation of our dough, providing structure and stability. Its moderate protein content (typically around 10-12%) makes it versatile for various types of bread. When combined with water and yeast, the proteins in the flour form gluten, which gives the dough its elasticity and strength. This gluten development is essential for trapping the gases produced during fermentation, leading to a light and airy roll. While bread flour could be used for a chewier texture, all-purpose flour strikes an ideal balance for soft, tender rolls.
Active Dry Yeast
Yeast is the magical ingredient that makes bread rise. Active dry yeast, a common choice for home bakers, consists of dehydrated yeast cells that need to be activated before use. This activation process involves dissolving the yeast in warm water (typically around 110°F or 43°C) with a pinch of sugar. The warmth and sugar awaken the yeast, allowing it to start feeding and producing carbon dioxide gas. This gas creates the bubbles that make the dough rise and gives the rolls their fluffy texture. It’s essential to ensure the water isn’t too hot, as extreme temperatures can kill the yeast, leading to flat, dense rolls.
Sugar
While sugar is often associated with sweetness, its role in bread-making goes beyond flavor. Sugar acts as food for the yeast during fermentation, promoting yeast activity and enhancing the rise of the dough. Additionally, sugar contributes to the browning of the rolls during baking, creating a beautiful golden crust. In our buttery garlic herb rolls, just a small amount of sugar is used to kickstart the yeast and elevate the overall flavor profile without making the rolls overly sweet.
Salt
Salt is a vital ingredient in any bread recipe, playing several important roles. First and foremost, salt enhances flavor, providing balance to the sweetness of the sugar and the richness of the butter. Moreover, it strengthens the gluten structure in the dough, resulting in a more cohesive and elastic texture. However, it’s essential to use the right amount; too much salt can inhibit yeast activity, while too little can lead to bland rolls. Striking the right balance ensures that the rolls are both flavorful and have the desired texture.
Olive Oil and Unsalted Butter
Both olive oil and unsalted butter contribute to the moistness and flavor of the rolls. Olive oil adds a subtle richness while enhancing the overall texture, making the rolls tender and soft. It also provides a touch of fruity flavor that complements the garlic and herbs beautifully. Unsalted butter, on the other hand, imparts a luxurious richness that elevates the rolls to new heights. Incorporating both fats ensures that every bite is decadent and satisfying.
Fresh Herbs vs. Dried Herbs
When it comes to flavoring our buttery garlic herb rolls, the choice between fresh and dried herbs can significantly impact the final outcome. Fresh herbs, such as parsley and rosemary, bring a vibrant, aromatic quality that dried herbs simply can’t match. They release essential oils during the baking process, infusing the rolls with their fresh, herbal notes. For the best flavor, using fresh garlic is also recommended, as it offers a pungent, savory profile that elevates the rolls. While dried herbs can be used in a pinch, the freshness of the ingredients will make a noticeable difference in taste.
Step-by-Step Guide to Making Buttery Garlic Herb Rolls
Now that we understand the essential ingredients, let’s dive into the step-by-step process of making these delightful rolls. The journey begins with activating the yeast, a critical step that sets the stage for perfect results.
Activating the Yeast
The first step in our buttery garlic herb rolls recipe is activating the yeast. Begin by measuring out warm water — the ideal temperature is between 100°F and 110°F (37°C to 43°C). If you don’t have a thermometer, a good rule of thumb is to test the water with your wrist; it should feel warm but not hot. Pour the warm water into a small bowl, then add a teaspoon of sugar and the active dry yeast. Gently stir the mixture to combine, then let it sit for about 5-10 minutes. During this time, the yeast will froth and bubble, indicating that it’s alive and ready to work its magic.
Mixing Dry Ingredients
While the yeast is activating, it’s time to prepare the dry ingredients. In a large mixing bowl, combine the all-purpose flour and salt. Mixing the salt with the flour at this stage helps ensure that the salt is evenly distributed throughout the dough. This step is crucial, as it prevents salt from coming into direct contact with the yeast, which could hinder its activation. Use a whisk or a fork to mix the ingredients thoroughly, creating a uniform blend that will form the backbone of our rolls.
Combining Mixtures
Once the yeast has activated and is frothy, it’s time to bring the wet and dry ingredients together. Create a well in the center of the flour mixture, then pour in the activated yeast mixture, along with the olive oil and melted unsalted butter. Use a wooden spoon or a spatula to gently stir the ingredients together, gradually incorporating the flour from the sides of the bowl. The goal is to achieve a shaggy dough that holds together but is not too sticky. If the mixture feels too wet, you can add a little more flour, a tablespoon at a time, until the desired consistency is reached.
Kneading the Dough
Once the dough has come together, transfer it to a lightly floured work surface for kneading. Kneading is a crucial process that develops gluten, giving the dough elasticity and strength. Begin by pressing the dough down with the palm of your hand, then fold it over itself and push down again. Rotate the dough a quarter turn and repeat this process. Continue kneading for about 8-10 minutes, or until the dough becomes smooth and elastic. You can check for doneness by performing the “windowpane test”: stretch a small piece of dough between your fingers; if it stretches without tearing, it’s ready for the next step.
First Rise
After kneading, shape the dough into a ball and place it in a lightly greased bowl, turning it once to coat the surface with oil. Cover the bowl with a clean kitchen towel or plastic wrap to retain moisture. The first rise is crucial for developing flavor and texture, so place the bowl in a warm, draft-free area. Ideal rising temperatures range from 75°F to 85°F (24°C to 29°C). Allow the dough to rise until it has doubled in size, which typically takes about 1 to 1.5 hours, depending on the temperature and humidity of your kitchen.
Creating the Flavorful Garlic Herb Mixture
While the dough is rising, you can prepare the flavorful garlic herb mixture that will be brushed over the rolls before baking. This mixture will infuse the rolls with rich garlic flavor and aromatic herbs.
To create this mixture, mince several cloves of fresh garlic and finely chop your choice of fresh herbs, such as parsley and rosemary. In a small bowl, combine the minced garlic with melted butter and a drizzle of olive oil. Season it with a pinch of salt and pepper to enhance the flavors. This savory blend will be used to brush over the rolls just before they go into the oven, ensuring that every bite is packed with delightful herbaceous notes.
Stay tuned for the next part of this article, where we’ll continue the journey by shaping the rolls, allowing them to rise again, and finally baking them to golden perfection.
{{image_2}}
Importance of Preparing the Herb Mixture in Advance
Preparing the herb mixture for your buttery garlic herb rolls in advance is essential for infusing maximum flavor into the dough. By allowing the herbs to meld with the garlic and butter, you create a concentrated blend that enhances the rolls’ taste profile. This mixture not only elevates the aroma but also ensures that each bite is bursting with rich flavors. Fresh herbs like parsley, thyme, or rosemary can be finely chopped and combined with melted butter and minced garlic. This step can be done ahead of time and stored in the refrigerator, allowing the flavors to develop even further.
Balancing Flavors: How Garlic and Herbs Enhance the Rolls
Garlic and herbs are a classic combination that adds depth and character to baked goods. The boldness of garlic pairs beautifully with the aromatic qualities of fresh herbs, creating a savory experience that complements the buttery dough. The key is to strike a balance, ensuring that neither flavor overpowers the other. When baked, garlic softens and sweetens, while herbs release their essential oils, enriching the overall flavor profile of the rolls. This combination not only delights the palate but also provides a fragrant aroma that fills your kitchen, making the baking experience truly inviting.
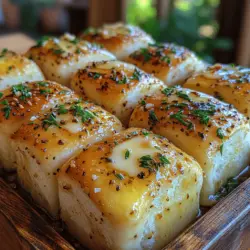
Shaping and Second Rise of the Rolls
Techniques for Shaping Dough into Perfect Rolls
Once your dough has risen and doubled in size, it’s time to shape it into rolls. Start by lightly flouring your work surface to prevent sticking. Gently punch down the dough to remove excess air, then divide it into equal pieces—generally, this recipe yields about 12 rolls. For a uniform shape, you can weigh each piece or simply eyeball it.
To shape the rolls, take each piece of dough and flatten it slightly into a disk. Fold the edges toward the center to create a small bun shape, then flip it over so the seam is on the bottom. Using your palms, gently roll the dough on the surface to create a smooth ball. Place each shaped roll onto a lined baking sheet, ensuring they are spaced apart to allow room for rising.
Understanding the Importance of the Second Rise for Texture
The second rise, or proofing, is a crucial step in roll-making that should not be skipped. This stage allows the gluten structure to relax and the yeast to continue its fermentation process. As the rolls rise again, they become lighter and airier, resulting in a tender crumb once baked. Cover the shaped rolls with a clean kitchen towel and let them rise for about 30-45 minutes in a warm place. You’ll know they are ready when they have puffed up and have almost doubled in size.
Baking the Rolls
Preheating the Oven: Why a Hot Oven is Crucial
Preheating your oven is an essential step that ensures your rolls bake evenly and rise properly. A hot oven creates steam, which is vital for achieving that perfect crust. Preheat your oven to 375°F (190°C) at least 20 minutes before you plan to bake the rolls. This way, you set the stage for browning the tops and achieving that delightful golden crust that everyone loves.
Baking Times and Temperatures: Achieving Golden Brown Perfection
When your rolls are ready for the oven, place them in the preheated oven and bake for 15-20 minutes. Keep an eye on them, looking for a beautiful golden-brown color. The rolls should sound hollow when tapped on the bottom, indicating they are fully baked. If you notice that the tops are browning too quickly, you can loosely cover them with aluminum foil to prevent burning while the insides continue to cook.
Finishing Touches: The Role of Brushing with Garlic Herb Butter
As soon as you take the rolls out of the oven, brush them generously with the prepared garlic herb butter. This finishing touch not only adds a glossy sheen but also infuses the surface with extra flavor. Allow the rolls to cool slightly before serving. The aroma of the garlic herb butter will be irresistible, and your guests will be eager to dig in.
Serving Suggestions
Ideal Pairings: What Dishes Complement Buttery Garlic Herb Rolls
Buttery garlic herb rolls are incredibly versatile and can complement an array of dishes. They make an excellent side for hearty soups like minestrone or creamy tomato basil. Additionally, they pair beautifully with salads, particularly those featuring robust dressings or grilled vegetables. For a more substantial meal, serve them alongside roasted meats or pasta dishes, where the rolls can soak up delicious sauces.
Serving Styles: Enjoying Rolls Warm, as Appetizers, or with Soups
These rolls can be enjoyed in various ways. Serve them warm and fresh out of the oven as a delightful appetizer with a side of olive oil and balsamic vinegar for dipping. Alternatively, for a cozy dinner, place them in a basket lined with a cloth to keep them warm and soft. You can also slice the rolls and use them for sliders or sandwiches, allowing your creativity to shine through.
Nutritional Information
Overview of the Nutritional Benefits of Ingredients Used
The ingredients used in these buttery garlic herb rolls not only contribute to their delicious flavor but also provide some nutritional benefits. Whole wheat flour, if used, can add fiber and essential nutrients compared to all-purpose flour. Garlic is known for its numerous health benefits, including its potential to boost the immune system and lower blood pressure. Herbs add minimal calories while providing antioxidants and vitamins.
Caloric Breakdown per Roll and Potential Dietary Considerations
Each buttery garlic herb roll contains approximately 150 calories, depending on the specific ingredients used and portion size. It’s important to note that these rolls are best enjoyed in moderation, especially for those monitoring their caloric intake. If you wish to make a lighter version, consider substituting some of the butter with Greek yogurt or using a lower-calorie spread for brushing.
Conclusion
Baking homemade buttery garlic herb rolls is a rewarding experience that brings joy not just through the aroma that fills your kitchen but also the satisfaction of sharing them with loved ones. These rolls are a testament to how simple ingredients can come together to create something truly special. Their versatility allows them to shine in various meals, whether served warm as an appetizer, alongside soups, or as a delightful addition to a main course.
Embrace the process of baking, allowing yourself to experiment and customize the rolls to your taste. Share them with family and friends, creating memories around the dining table. With each batch you bake, you’ll find that the joy of homemade bread is a gift that keeps on giving. So gather your ingredients, follow these steps, and enjoy the delicious results of your culinary efforts. Happy baking!