Indulge in the Delight of Banana Bliss No-Bake Pie Cups
In the realm of desserts, no-bake recipes have carved out a special place, particularly when the heat of summer makes the thought of turning on an oven rather unappealing. These delightful creations allow dessert lovers to whip up something sweet and satisfying without the need for baking, making them a go-to option for hot weather gatherings or simply as a treat to cool off with at home. Among the various no-bake delights, the Banana Bliss No-Bake Pie Cups stand out with their creamy texture, delightful banana flavor, and ease of preparation.
Whether you are hosting a backyard barbecue, attending a potluck, or just looking for a simple dessert to enjoy on a weeknight, these pie cups are versatile enough to fit any occasion. Their individual servings make them perfect for sharing, while the combination of bananas and cream will leave everyone craving more. Let’s dive into this delectable recipe that promises to bring joy and satisfaction to any dessert table.
Understanding the Ingredients
Creating the perfect Banana Bliss No-Bake Pie Cups involves selecting high-quality ingredients that each play a vital role in achieving the desired flavor and texture. Here’s a closer look at the essential components of this delightful dessert:
– Graham Cracker Crumbs: The foundation of the pie cups begins with graham cracker crumbs. This ingredient serves as the crunchy base that contrasts beautifully with the creamy filling. The slightly sweet and buttery flavor of graham crackers complements the bananas, creating a balanced taste that is both satisfying and enjoyable. When mixed with a bit of melted butter, these crumbs form a delicious crust that holds everything together.
– Granulated Sugar: Sugar is more than just a sweetener in this recipe; it enhances the overall flavor profile of the pie cups. The right amount of granulated sugar balances the ingredients, ensuring that the banana flavor shines through without being overly sweet. This crucial ingredient contributes to the overall texture and helps to create a smooth, velvety filling when combined with whipped cream and pudding.
– Unsalted Butter: Butter brings richness and depth to the crust, binding the graham cracker crumbs together while adding a luxurious mouthfeel. Using unsalted butter allows for better control of the overall saltiness of the dish, ensuring that the sweet flavors of the dessert remain front and center. The combination of butter and graham cracker crumbs creates a sturdy and delectable base that will hold up beautifully in individual servings.
– Whipped Cream: The lightness of whipped cream is what truly elevates the Banana Bliss Pie Cups. You can choose between store-bought whipped cream for convenience or make your own for a fresher taste. Whipped cream introduces an airy element to the dessert, making it feel indulgent yet light. The fluffy texture complements the creamy filling and enhances the overall experience of each bite.
– Instant Vanilla Pudding Mix: One of the standout features of this recipe is the use of instant vanilla pudding mix. It offers a quick and easy way to achieve a rich and creamy filling without the need for cooking. The pudding mix thickens the mixture while infusing it with a delightful vanilla flavor, making it a perfect pairing with the bananas.
– Milk: Milk plays a critical role in this recipe by hydrating the instant pudding mix and ensuring a smooth, creamy texture. The right amount of milk is key to achieving the desired consistency for the filling. Whole milk is recommended for its richness, but you can use a lower-fat version if desired.
– Bananas: At the heart of the Banana Bliss No-Bake Pie Cups lies the humble banana. Ripe bananas not only provide natural sweetness but also contribute to the creamy texture of the filling. Their distinct flavor is the star of this dessert, offering a nostalgic taste that many people adore. Slicing the bananas into the filling and as a garnish adds both flavor and visual appeal.
– Vanilla Extract: A splash of vanilla extract enhances the overall flavor profile of the pie cups, adding depth and warmth to the dessert. This ingredient is a staple in many sweet recipes, and its inclusion here helps to elevate the flavors of the bananas and pudding, creating a harmonious blend that is sure to impress.
– Chocolate Shavings or Mini Chocolate Chips: While optional, chocolate shavings or mini chocolate chips are a delightful addition that brings a touch of decadence to the Banana Bliss Pie Cups. These garnishes not only add visual interest but also a rich flavor contrast that pairs beautifully with the creaminess of the filling and the sweetness of the bananas.
Step-by-Step Instructions for Banana Bliss No-Bake Pie Cups
Now that we’ve explored the ingredients, it’s time to dive into the preparation of these delightful Banana Bliss No-Bake Pie Cups. This simple step-by-step guide will help you create a dessert that’s sure to impress your family and friends, all while being incredibly easy to put together.
1. Prepare the Crust: Begin by crushing the graham crackers into fine crumbs. You can do this by placing them in a zip-top bag and using a rolling pin, or by pulsing them in a food processor. Transfer the crumbs to a mixing bowl and combine them with melted unsalted butter and granulated sugar. Stir until the mixture resembles wet sand.
2. Assemble the Cups: Take your serving cups or small bowls and evenly distribute the graham cracker mixture into the bottom of each cup, pressing down gently to form a solid base. Place the cups in the refrigerator to firm up while you prepare the filling.
3. Make the Filling: In a separate bowl, whisk together the instant vanilla pudding mix and cold milk until it thickens. This should take just a couple of minutes. Once thickened, gently fold in the whipped cream until fully incorporated, creating a light and fluffy filling.
4. Add Bananas: Slice ripe bananas and fold them into the pudding mixture. The bananas should be added just before assembling the cups to prevent browning.
5. Layer the Filling: Remove the prepared cups from the refrigerator and spoon the banana pudding mixture over the graham cracker crust, filling each cup generously.
6. Chill: For the best flavor and texture, refrigerate the assembled pie cups for at least an hour to allow everything to set properly. This chilling step is essential for achieving the perfect creamy consistency.
As you can see, making Banana Bliss No-Bake Pie Cups is a straightforward process that anyone can master. With just a few simple steps, you’ll be well on your way to creating an indulgent dessert that’s perfect for any occasion. Stay tuned for the concluding steps and serving suggestions that will elevate your dessert to the next level.
{{image_2}}
Creating delightful desserts doesn’t have to be complicated, and the Banana Bliss No-Bake Pie Cups are a perfect example of that. This easy-to-follow recipe allows you to whip up a delicious treat that captures the flavors of banana cream pie without the need for baking. Packed with creamy pudding, fresh banana slices, and a crunchy graham cracker crust, these pie cups will be a hit at any gathering or for a simple family dessert. Let’s dive into the detailed steps for preparing these delightful pie cups.
Preparing the Crust
The crust is the foundation of our Banana Bliss No-Bake Pie Cups, and it’s essential to get it just right. Start by gathering your ingredients: graham cracker crumbs, granulated sugar, and melted butter.
1. Mixing Ingredients: In a medium-sized mixing bowl, combine 1 cup of graham cracker crumbs with 2 tablespoons of granulated sugar. The sugar adds a hint of sweetness, balancing the flavors of the crust.
2. Adding Butter: Pour in 4 tablespoons of melted butter. It’s crucial that the butter is melted but not too hot, as this can affect the texture of your crust.
3. Achieving the Right Texture: Mix the ingredients together until the crumbs are evenly coated with butter and the mixture resembles wet sand. You should be able to squeeze a handful of the mixture, and it holds together. If it feels too crumbly, add a little more melted butter, one teaspoon at a time.
4. Pressing the Crust: Using your fingers or the bottom of a measuring cup, firmly press the crust mixture into the bottom and up the sides of your serving cups. Aim for about 1/4 inch thickness to ensure it holds its shape when filled.
Building the Base
Now that your crust is prepared, it’s time to build the base of your pie cups.
1. Layering Technique: Ensure that the crust is evenly distributed in each cup. This provides a solid base for the delicious pudding layer that will follow. Press the crust down firmly to prevent it from crumbling when you add the filling.
2. Setting Aside: Once all cups are filled with crust, set them aside while you prepare the pudding layer.
Creating the Pudding Layer
The pudding layer is the heart of these pie cups, providing a creamy and rich texture.
1. Mixing the Pudding: In a separate bowl, add 2 cups of cold milk and 1 package (3.4 ounces) of instant vanilla pudding mix. Use a whisk to mix the two together until the pudding begins to thicken.
2. Ensuring Proper Thickness: To achieve the perfect consistency, whisk the mixture for about 2 minutes. If you want a thicker pudding, you can let it sit for a few additional minutes to allow it to set further.
3. Optional Flavor Enhancements: For an added flavor boost, consider mixing in 1 teaspoon of vanilla extract or a pinch of cinnamon before the pudding sets completely.
Layering the Pudding
Now it’s time to layer the pudding into your prepared cups.
1. Distributing the Pudding: Using a spoon or a piping bag, carefully spoon or pipe the pudding mixture into each cup over the crust. Aim for an even distribution, filling the cups about two-thirds full.
2. Smoothing the Top: Use the back of the spoon or a small spatula to smooth the top of the pudding. This not only enhances presentation but also helps to create a flat surface for the banana slices.
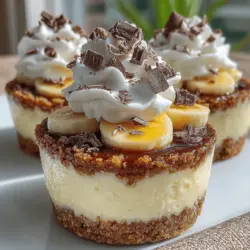
Adding the Bananas
Adding fresh bananas gives the pie cups a beautiful and inviting look.
1. Slicing the Bananas: Peel 2 ripe bananas and slice them into approximately 1/4-inch thick rounds.
2. Arranging the Slices: Carefully arrange the banana slices on top of the pudding layer. You can create a spiral pattern or simply layer them in a single layer. Aesthetically, overlapping the banana slices slightly can add visual appeal.
Final Layering and Presentation
The final steps involve smoothing and preparing the pie cups for the whipped cream topping.
1. Smoothing the Pudding: If there are any gaps or uneven surfaces, use a spatula to smooth the pudding gently, creating a flat surface for the whipped cream.
Adding the Whipped Cream Topping
The whipped cream adds a luscious finish to these pie cups.
1. Whipping the Cream: In a chilled mixing bowl, add 1 cup of heavy cream and 2 tablespoons of powdered sugar. Whip the cream using an electric mixer on medium speed until soft peaks form.
2. Piping the Cream: For a beautiful presentation, use a piping bag fitted with a star tip to pipe the whipped cream onto the top of each cup. If you don’t have a piping bag, a simple spoonful will work just fine.
Garnishing
Enhance the visual appeal and flavor of your pie cups with some thoughtful garnishes.
1. Creative Garnishing Options: Consider adding a sprinkle of chocolate shavings, a drizzle of chocolate syrup, or a few additional banana slices on top of the whipped cream. You could also use crushed nuts or a dusting of cocoa powder for an added texture.
Chilling the Cups
Chilling the pie cups is crucial for setting the layers and enhancing the flavors.
1. Importance of Chilling: Cover the cups with plastic wrap and place them in the refrigerator for at least 2 hours before serving. This allows the pudding to firm up and the flavors to meld together beautifully.
Serving Suggestions
When it’s time to serve your Banana Bliss No-Bake Pie Cups, consider the following presentation ideas:
1. Presentation Styles: You can serve them directly in the cups for a casual gathering or transfer them onto a decorative platter for a more formal occasion.
2. Adaptability: This dessert is versatile! For gluten-free options, simply substitute the graham cracker crust with gluten-free cookies or oats. You can also explore using almond milk or coconut cream for those with dairy preferences.
Nutritional Information
Understanding the nutritional aspects of your dessert can help you make informed choices.
1. Nutritional Breakdown: Each Banana Bliss No-Bake Pie Cup contains approximately 250 calories, 15 grams of fat, 20 grams of sugar, and 4 grams of protein.
2. Making Healthier Substitutions: For a healthier version, consider using low-fat milk in the pudding, reducing the sugar, or opting for a sugar-free pudding mix. You can also substitute bananas with other fruits like berries or peaches for different flavor profiles.
Conclusion
In conclusion, the Banana Bliss No-Bake Pie Cups are not only easy to make but also a delightful treat that everyone will enjoy. Their creamy, rich texture combined with the freshness of bananas creates a dessert that satisfies sweet cravings without the hassle of baking. Encourage your creativity by experimenting with different fruits or flavors to make these pie cups your own. Whether it’s a family gathering, a potluck, or simply a sweet treat for yourself, these pie cups will undoubtedly bring smiles to faces and joy to any occasion. Now it’s your turn to get in the kitchen and create these delicious pie cups!