Introduction to Cherry Bliss Pie Bars with Almond Glaze
In the world of desserts, few things can rival the joy of homemade pie bars, especially when they feature the vibrant flavors of cherries and the nutty essence of almond. Cherry Bliss Pie Bars with Almond Glaze are not just a treat for the taste buds; they are a feast for the eyes. These delightful bars combine a luscious cherry filling with a buttery crust, topped off with a smooth almond glaze, making them perfect for gatherings, picnics, or simply indulging at home. The combination of sweet and tart cherries, complemented by the rich and warm notes of almond, creates a dessert experience that is sure to impress.
The allure of Cherry Bliss Pie Bars lies not only in their taste but also in their versatility. They can be served warm, at room temperature, or chilled, allowing you to enjoy them in different ways depending on the occasion. Whether you’re hosting a summer barbecue, celebrating a birthday, or looking for a special treat for a cozy night in, these pie bars are the ideal choice.
This article will guide you through every step of creating these delectable bars, from selecting the best cherries to mastering the perfect almond glaze. By the end, you’ll be equipped with all the knowledge you need to whip up a batch of these enticing dessert bars that are sure to become a family favorite.
Understanding Cherry Bliss Pie Bars
Exploration of Cherry as a Star Ingredient
Cherries are the star of this dessert, bringing not only vibrant color but also a burst of flavor. Rich in antioxidants, vitamins, and minerals, cherries are a nutritious choice that can elevate any dish. They are particularly high in vitamin C, which supports the immune system, and contain potassium, which is essential for heart health. Additionally, cherries are known for their anti-inflammatory properties, making them a healthful addition to your diet when consumed in moderation.
When it comes to selecting cherries, it’s important to consider their seasonal availability. Fresh cherries are usually in season from late spring to early summer, making this the best time to enjoy them at their peak flavor and juiciness. When shopping for cherries, look for firm, plump fruits with a deep color. Avoid any that are bruised or have blemishes. If fresh cherries are out of season, frozen cherries can be a convenient alternative, as they are typically frozen at their peak ripeness and can work just as well in this recipe.
The Importance of Almond in Dessert Recipes
Almonds offer a delightful nutty flavor that beautifully complements the sweetness of cherries. When used in desserts, almonds can enhance the overall taste profile with their rich, buttery notes. In addition to their flavor, almonds are packed with health benefits. They are a great source of healthy fats, protein, and fiber, which can help promote satiety and support overall health. Almonds are also rich in vitamin E, an antioxidant that supports skin health and may help reduce the risk of chronic diseases.
Almond extract, a key ingredient in the almond glaze for this recipe, intensifies the nutty flavor and adds an aromatic quality that brings the entire dessert together. This subtle yet fragrant essence is what makes the glaze truly shine and elevates the Cherry Bliss Pie Bars from ordinary to extraordinary.
The Components of Cherry Bliss Pie Bars
Detailed Breakdown of the Cherry Filling
The cherry filling is the heart of the Cherry Bliss Pie Bars, and it’s essential to get it just right. When preparing the filling, the choice between fresh and frozen cherries is pivotal. Fresh cherries need to be pitted and chopped, while frozen cherries can be used directly, but it’s advisable to let them thaw and drain excess liquid to prevent a runny filling.
Sugar and cornstarch play crucial roles in the filling. Sugar not only sweetens the cherries but also helps draw out their natural juices, creating a deliciously gooey filling. Cornstarch acts as a thickening agent, ensuring the filling holds together well when baked, providing that perfect sliceable texture. Adding a splash of lemon juice brightens the flavor profile, while a dash of vanilla extract enhances the overall taste, making each bite a burst of flavor.
Overview of the Crust and Topping Mixture
The crust of the Cherry Bliss Pie Bars is what provides the essential structure and texture. A buttery crust is critical for achieving that melt-in-your-mouth quality, and using high-quality unsalted butter is recommended. The balance of granulated and brown sugar in the crust adds not only sweetness but also a depth of flavor, with brown sugar contributing a subtle caramel note.
Baking powder is another key ingredient in the crust. It provides the necessary lift, ensuring that the bars have a light and airy texture rather than being dense. When combined with the right proportions of flour and butter, the result is a perfectly balanced crust that serves as a delightful base for the cherry filling.
Creating the Almond Glaze
The almond glaze is the crowning touch that ties everything together. To create this glossy finish, you’ll need powdered sugar, almond extract, and a little milk or cream to achieve the desired consistency. The powdered sugar provides sweetness and a smooth texture, while the almond extract amplifies the nutty flavor, creating a harmonious blend with the cherries.
Optional garnishes, such as sliced almonds or a sprinkle of flaky sea salt, can elevate the presentation of the Cherry Bliss Pie Bars, making them not only delicious but also visually appealing. The glaze can be drizzled over the cooled bars just before serving, adding a lovely sheen and an extra layer of flavor that will entice anyone who lays eyes on them.
Step-by-Step Preparation of Cherry Bliss Pie Bars
The preparation of Cherry Bliss Pie Bars is straightforward and can be broken down into simple steps. To get started, gather your equipment, which includes a saucepan for cooking the cherry filling, mixing bowls for combining ingredients, and a baking pan for the bars.
Preparation of the Cherry Filling
1. Equipment Needed: A medium-sized saucepan, mixing utensils (a wooden spoon or spatula), and a measuring cup.
2. Cooking Process: Begin by pitting and halving the cherries if using fresh ones, or measuring out your frozen cherries. In the saucepan, combine the cherries with sugar, cornstarch, lemon juice, and vanilla. Cook over medium heat, stirring gently until the mixture starts to bubble and thicken. This should take about 5-7 minutes.
3. Achieving the Right Consistency: The filling should be thick enough to hold its shape but still pourable. If it seems too thin, add a little more cornstarch mixed with a splash of water to thicken it further. Once done, remove from heat and let it cool slightly before assembling the bars.
This initial step sets the foundation for the luscious filling that will make your Cherry Bliss Pie Bars a standout dessert. As you continue with the preparation of the crust and the almond glaze, you’ll see how these components come together to create a delightful treat that’s sure to impress. Stay tuned for the next part, where we will delve into the specifics of creating the crust and the almond glaze for these irresistible pie bars.
{{image_2}}
Crafting the Crust and Topping
Creating the perfect crust and topping for your Cherry Bliss Pie Bars is a crucial step that sets the foundation for flavor and texture. Here’s how to achieve that crumbly, buttery goodness.
Proper Mixing Techniques for a Crumbly Dough
To begin, ensure your butter is cold and diced into small cubes. This is vital for obtaining a flaky crust. In a large mixing bowl, combine your flour, sugar, and salt. Use a pastry cutter or your fingertips to blend the cold butter with the dry ingredients until the mixture resembles coarse crumbs. Be cautious not to overmix; the goal is to keep small bits of butter intact, which will create a desirable flaky texture once baked.
The Significance of Chilling and Resting the Dough
After mixing, it’s essential to chill your dough. Wrap it in plastic wrap and refrigerate for at least 30 minutes. Chilling the dough not only helps in firming it, making it easier to handle, but also allows the gluten to relax, ensuring a tender crust. This resting period is crucial for achieving the right texture in your Cherry Bliss Pie Bars.
Techniques for Even Pressing into the Pan
Once chilled, remove the dough from the refrigerator. Using a rolling pin, roll out about 2/3 of the dough on a lightly floured surface until it’s slightly larger than your baking pan. Transfer the rolled dough to your greased pan, carefully pressing it into the corners and sides. If it tears, simply patch it with additional dough. The remaining dough will be used for the topping, so make sure to keep it covered while you work.
Assembling the Bars
With the crust ready, it’s time to layer in the cherry filling and the crumbly topping.
Layering Techniques for Optimal Flavor Distribution
Start by pouring your prepared cherry filling over the crust, spreading it evenly with a spatula. This ensures that every bite of your Cherry Bliss Pie Bars will be filled with delicious cherry flavor. For the topping, crumble the reserved dough over the cherry layer. Aim for a mix of larger and smaller crumbles, as this variance will create a delightful texture when baked.
Tips for Crumbling the Topping Effectively
To achieve the ideal crumbly topping, use your fingers to break apart the dough gently. If the dough is too soft, refrigerate it briefly until it firms up. For a more textured topping, consider adding chopped almonds or oats to the crumble mixture for added crunch and flavor.
Ensuring Even Baking for a Consistent Texture
When baking, make sure your oven is preheated to the correct temperature. Place the assembled bars in the center of the oven to ensure even heat distribution. Baking at a consistent temperature allows the crust to cook through without burning, while the topping becomes golden brown and delicious.
Baking Process and Timing
Understanding the baking process is essential for achieving the perfect Cherry Bliss Pie Bars.
Understanding Oven Temperatures and Baking Times
The ideal baking temperature for these bars is 350°F (175°C). Bake for approximately 35-40 minutes, or until the topping is golden brown and the cherry filling is bubbling. Ovens can vary, so it’s wise to check the bars a few minutes before the recommended baking time.
How to Check for Doneness Without Cutting
To check for doneness, look for visual cues. The edges should be firm and slightly pulling away from the sides of the pan, while the center should be set but still a bit soft, as it will continue to firm up while cooling.
Cooling Tips to Maintain Structural Integrity
Once baked, remove the bars from the oven and place them on a wire rack to cool completely in the pan. This prevents steam from collecting underneath, which could make the crust soggy. Allowing them to cool fully also helps the filling to set, making it easier to cut into neat squares.
Finishing Touches: The Almond Glaze
A delicious almond glaze is the crowning touch that elevates your Cherry Bliss Pie Bars.
Creating the Perfect Almond Glaze
For the almond glaze, whisk together powdered sugar, almond extract, and a little milk until smooth. The ideal consistency should be thick enough to drizzle but thin enough to flow easily. If it’s too thick, add a splash of milk; if it’s too thin, incorporate more powdered sugar.
The Significance of Allowing the Bars to Cool Before Glazing
It’s crucial to let the bars cool completely before applying the glaze. If the bars are warm, the glaze will melt and lose its beautiful finish. Once cooled, drizzle the glaze over the bars using a fork or piping bag for a more refined look.
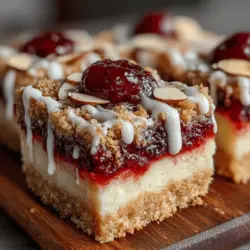
Decorating Suggestions for a Stunning Finish
For an eye-catching presentation, consider garnishing the glazed bars with slivered almonds or a sprinkle of edible glitter. Fresh cherries on top can also enhance the visual appeal and indicate the flavor within.
Serving and Enjoying Cherry Bliss Pie Bars
Now that your Cherry Bliss Pie Bars are finished, it’s time to serve and enjoy them!
Presentation Ideas
Serve your bars on a decorative platter or cut them into bite-sized squares for a party-friendly option. Adding a dusting of powdered sugar or a dollop of whipped cream on top can make them even more inviting.
Pairing Suggestions with Beverages or Sides
These cherry pie bars pair beautifully with vanilla ice cream, whipped cream, or a scoop of yogurt. For drinks, consider serving them with a glass of iced tea, a fruity punch, or even a light sparkling wine for a more festive touch.
Storage Tips for Freshness
To keep your Cherry Bliss Pie Bars fresh, store them in an airtight container at room temperature for up to three days. For longer storage, consider refrigerating them, where they can last up to a week. If you wish to freeze them, wrap individual bars tightly in plastic wrap and store them in a freezer-safe bag for up to three months. Just thaw at room temperature before enjoying.
Nutritional Information
Understanding the nutritional content of your Cherry Bliss Pie Bars can enhance your baking experience.
Nutritional Breakdown of Cherry Bliss Pie Bars
Each serving (one square) of Cherry Bliss Pie Bars contains approximately:
– Calories: 230
– Total Fat: 10g
– Saturated Fat: 4g
– Carbohydrates: 34g
– Sugars: 16g
– Fiber: 2g
– Protein: 2g
Key Nutrients and Their Benefits
These bars provide a good source of carbohydrates for energy and include healthy fats from the almonds. The cherries offer antioxidants, vitamins, and minerals, making these bars a delightful treat that can also provide some nutritional benefits.
Conclusion: Embrace the Delight of Cherry Bliss Pie Bars
Cherry Bliss Pie Bars with Almond Glaze offer a wonderful combination of flavor, texture, and visual appeal. They are a testament to the beauty of homemade desserts, showcasing the magic that happens when simple ingredients come together. Whether you are a seasoned baker or a novice in the kitchen, this recipe will not only satisfy your sweet tooth but also leave a lasting impression on anyone lucky enough to share in the experience. Enjoy the process, savor the flavors, and relish in the joy that these cherry pie bars bring to any occasion.