Introduction
Delve into the irresistible world of baked treats with our delightful Cinnamon Roll Bliss Bars. These bars capture the warm, comforting flavors of traditional cinnamon rolls but with a simplified, bar-style twist. Imagine the soft, pillowy texture of cinnamon rolls, combined with the ease of a quick-to-make bar that can be enjoyed at any time of the day. Perfect for breakfast, dessert, or an afternoon snack, these blissful bars are sure to become a household favorite.
Cinnamon roll enthusiasts will appreciate the familiar flavor profile of these bars, while those who often shy away from traditional roll-making will find the process of creating these bars much more approachable. With a fraction of the time and effort needed to roll out dough and shape individual rolls, you can whip up a batch of Cinnamon Roll Bliss Bars that are just as delectable.
In this article, we will guide you through the recipe step-by-step, exploring the delightful nuances of the ingredients, the baking process, and serving suggestions. Whether you’re a seasoned baker or a novice in the kitchen, you’ll find that these bars are not only easy to make but also utterly satisfying to enjoy.
The Allure of Cinnamon Roll Bliss Bars
Understanding the Appeal of Cinnamon Rolls
Cinnamon rolls have been a beloved treat for generations, often associated with cozy mornings and family gatherings. Their alluring aroma fills the home, evoking feelings of warmth and comfort. The combination of sweet dough, fragrant cinnamon, and creamy icing makes them a quintessential treat that many crave. However, while traditional cinnamon rolls are a delightful indulgence, they can be time-consuming to prepare, requiring precise rolling and rising times.
Cinnamon Roll Bliss Bars, on the other hand, provide all the same mouthwatering flavors without the hassle of intricate preparation. This makes them a fantastic option for those who want to enjoy the taste of cinnamon rolls without dedicating an entire morning to baking. Each bite is a celebration of sweet and spicy goodness, making it hard to resist going back for seconds.
A Brief History of Cinnamon in Baking
Cinnamon has been used in baking for centuries, dating back to ancient civilizations where it was prized not only for its flavor but also for its medicinal properties. In the culinary world, cinnamon is often celebrated for its warm, sweet-spicy notes, making it a favorite in various dishes around the globe. From sweet pastries and breads to savory stews, cinnamon adds a unique depth that enhances the overall flavor profile.
In the West, cinnamon rolls gained popularity in the 18th century, thanks to the introduction of cinnamon from trade routes. These rolls became a staple in bakeries and homes alike, often enjoyed warm with a generous drizzle of icing. The transition from traditional rolls to simplified bar versions reflects a modern culinary trend where convenience meets nostalgia, allowing us to enjoy classic flavors in new, innovative ways.
Why Bars are a Convenient Alternative to Rolls
The beauty of Cinnamon Roll Bliss Bars lies in their simplicity. Unlike traditional cinnamon rolls, which require the dough to be rolled out, cut, and shaped, bars eliminate these steps entirely. With bars, you can mix your ingredients, pour the batter into a pan, and bake—all in a fraction of the time.
This convenient format makes them ideal for busy mornings or spontaneous gatherings. You can prepare a batch ahead of time, store them in an airtight container, and enjoy them throughout the week. Plus, they are easy to slice and serve, making them perfect for sharing. Whether you’re hosting a brunch or simply looking for a sweet treat to enjoy with your afternoon coffee, these bliss bars are the perfect solution.
Ingredient Breakdown
To create the perfect Cinnamon Roll Bliss Bars, it’s essential to understand the role of each ingredient. Here’s a closer look at what you’ll need:
All-Purpose Flour: The Foundation of Your Bars
All-purpose flour is the backbone of many baked goods, and these bars are no exception. It provides the necessary structure and stability, allowing the bars to rise and maintain their shape during baking. For optimal results, be sure to measure your flour accurately. Too much flour can lead to dense bars, while too little can result in a gooey texture.
Granulated Sugar: Sweetening the Deal
Granulated sugar adds sweetness and helps to create a tender crumb. It also plays a vital role in the creaming process, which is crucial for incorporating air into the batter. This process will help your bars achieve that light and fluffy texture that everyone loves.
Unsalted Butter: For that Perfect Texture
Unsalted butter is preferred in baking as it allows you to control the amount of salt in your recipe. The butter contributes richness and moisture to the bars, ensuring they remain soft and tender. Be sure to use softened butter for better incorporation with the sugar.
Brown Sugar: Adding Depth and Richness
Brown sugar adds a deeper flavor and slight moisture to the bars. Its molasses content contributes to the caramel notes that complement the cinnamon beautifully. Using a combination of granulated and brown sugar will create a more complex flavor profile in your bliss bars.
Milk: Moisture and Creaminess
Milk is crucial for achieving the right batter consistency. It adds moisture and richness, resulting in a tender crumb. You can use whole milk for creaminess or opt for a lower-fat option if preferred.
Eggs: Binding and Leavening Agents
Eggs serve as binding agents in baking, helping to hold the ingredients together. They also provide leavening, which contributes to the overall rise of the bars. Be sure to use eggs at room temperature for the best incorporation.
Baking Powder: The Secret to Fluffiness
Baking powder is a leavening agent that helps the bars rise during baking. It creates air bubbles in the batter, giving the bars their light and fluffy texture. Ensure your baking powder is fresh for the best results.
Vanilla Extract: Enhancing Flavor
Vanilla extract is essential for adding depth of flavor to your bars. It complements the cinnamon and sugar, enhancing the overall sweetness and aroma. Opt for pure vanilla extract for the best flavor.
Ground Cinnamon: The Star of the Show
Ground cinnamon is the hallmark spice in this recipe. Its warm, sweet-spicy flavor is what makes these bars reminiscent of traditional cinnamon rolls. Don’t be shy—use a generous amount to ensure your bars are bursting with cinnamon goodness.
Salt: Balancing the Sweetness
A pinch of salt is critical in any baked good, as it enhances the flavors and balances the sweetness of the sugar. It also helps to bring out the warm notes of cinnamon, making each bite even more enjoyable.
Optional Add-ins: Chopped Pecans or Walnuts
For those who enjoy a bit of crunch, consider adding chopped pecans or walnuts to your bliss bars. These nuts not only enhance the texture but also add a rich, nutty flavor that pairs wonderfully with the cinnamon.
Step-by-Step Instructions
Now that we’ve covered the essential ingredients, it’s time to embark on the exciting journey of making Cinnamon Roll Bliss Bars. The following steps will guide you through the process, ensuring a successful bake every time.
Preheating the Oven: Setting the Stage for Baking
Before you dive into mixing your ingredients, it’s crucial to preheat your oven to 350°F (175°C). This ensures that your bars will bake evenly from the moment they are placed in the oven. A well-preheated oven contributes to the perfect rise and texture.
Preparing Your Baking Dish: Greasing vs. Lining with Parchment
Next, choose your baking dish—a 9×13 inch pan works perfectly for this recipe. You can either grease the pan with butter or cooking spray or line it with parchment paper for easy removal. Lining with parchment will also help prevent sticking, making it easier to slice and serve the bars once baked.
Creating the Batter
Creating the batter is the most critical part of the process. Follow these steps for a smooth and well-incorporated mixture:
Creaming Butter and Sugar: Why This Process Matters
Start by placing the softened unsalted butter and granulated sugar into a mixing bowl. Using an electric mixer or a whisk, cream the butter and sugar together until the mixture is light, fluffy, and pale in color. This process typically takes about 2-3 minutes and is essential for incorporating air into the batter, which will help your bars rise beautifully while baking.
As you cream the butter and sugar, the granules of sugar will create tiny air pockets in the butter, resulting in a light texture. This step is often overlooked, but it is crucial for achieving the ideal consistency in your Cinnamon Roll Bliss Bars.
Once the butter and sugar are well combined, you’ll gradually add the brown sugar, continuing to mix until fully incorporated. The combination of both sugars will create a delightful sweetness and contribute to the overall flavor of your bars.
Now that the butter and sugar are perfectly creamed, we can continue to the next steps in our recipe journey, where we’ll incorporate the remaining ingredients and bring our Cinnamon Roll Bliss Bars to life. Stay tuned for the next part, where we’ll delve into mixing in the remaining ingredients and the baking process!
{{image_2}}
Incorporating Wet Ingredients: The Role of Eggs and Milk
In the preparation of Cinnamon Roll Bliss Bars, the incorporation of wet ingredients is crucial for achieving the desired texture and flavor. Eggs serve multiple roles in baking; they not only provide richness and flavor but also act as a binding agent to hold the ingredients together. This is particularly important in a recipe that transforms classic cinnamon rolls into bars, ensuring that they maintain their structure while being soft and tender.
Milk contributes moisture and helps to create a smooth batter. It also activates the dry ingredients, ensuring an even distribution of flavor throughout the bars. As you mix in the eggs and milk, take care to combine them until just incorporated. This will help maintain the light, fluffy texture that is characteristic of a good cinnamon roll.
Mixing Dry Ingredients: Importance of Not Overmixing
When it comes to mixing the dry ingredients, it’s imperative to strike a balance. Combine your flour, baking powder, cinnamon, and a pinch of salt in a separate bowl. Whisk these ingredients together until well blended. The key here is to avoid overmixing once the dry ingredients are combined with the wet ingredients. Overmixing can lead to a dense and tough texture in your bars, which is not what we want. Instead, mix until you see no dry flour—this ensures that the ingredients are just combined without developing too much gluten.
Layering with Brown Sugar Mixture
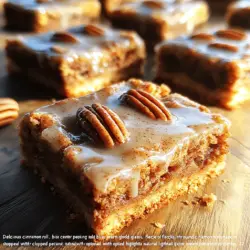
Now that your batter is prepared, it’s time to layer in the brown sugar mixture. This mixture is what gives your Cinnamon Roll Bliss Bars that deliciously sweet cinnamon flavor that we all crave. In a small bowl, combine brown sugar with additional cinnamon. The ratio can be adjusted based on your preference for sweetness and spice. Once combined, sprinkle this mixture evenly over the batter spread in your baking pan.
Perfecting the Cinnamon-Sugar Layer
To ensure that each bite of your Cinnamon Roll Bliss Bars is filled with that signature cinnamon-sugar goodness, it’s essential to distribute the mixture evenly. Use a spatula to spread the batter into the corners of the pan before adding the cinnamon-sugar layer. After sprinkling the mixture, consider adding a light drizzle of melted butter over the top. This will help the sugar caramelize during baking, creating a delightful crust.
Spreading and Swirling: Techniques for a Beautiful Marbled Effect
Next comes the fun part—spreading and swirling! Using a knife or a skewer, gently swirl the cinnamon-sugar mixture into the batter. Be careful not to mix it completely; you want to create a marbled effect rather than fully integrate the layers. This technique not only enhances the visual appeal but also ensures that every bite contains a delicious blend of flavors.
Baking the Bars
Ideal Baking Time and Temperature
Preheat your oven to 350°F (175°C) and prepare your baking dish by greasing it or lining it with parchment paper. Pour your prepared batter into the dish and smooth it out evenly. Bake the bars for approximately 25-30 minutes. Keep an eye on them as they approach the 25-minute mark; ovens can vary in temperature, so it’s important to check for doneness.
Recognizing When They Are Done
To check if your Cinnamon Roll Bliss Bars are done, insert a toothpick into the center. If it comes out clean or with a few moist crumbs, they’re ready to be taken out of the oven. Avoid overbaking, as this can lead to a dry texture. Allow the bars to cool in the pan for about 10-15 minutes before transferring them to a wire rack to cool completely.
Making the Glaze
The Perfect Consistency: Thicker vs. Thinner Glaze
While your bars are cooling, it’s time to prepare the glaze. A classic glaze for Cinnamon Roll Bliss Bars is made from powdered sugar, milk, and vanilla extract. The key to a great glaze is achieving the perfect consistency. If you prefer a thicker glaze, use less milk, and if you like it thinner, gradually add more until you reach your desired pourable state.
Flavor Variations for Your Glaze
Feel free to get creative with your glaze! For a different flavor profile, consider adding a hint of maple syrup or almond extract. You can also incorporate spices like nutmeg or even a touch of cocoa powder for a chocolatey twist. The glaze serves not just as a sweet topping but enhances the overall flavor of the bars.
Cooling and Serving
The Importance of Cooling Time
Patience is key when it comes to these blissful bars. Allow your Cinnamon Roll Bliss Bars to cool completely before slicing. This cooling time helps the bars set, making them easier to cut without crumbling. A minimum of 30 minutes is recommended for cooling to ensure that the texture is just right.
Tips for Slicing Bars Neatly
To achieve neat slices, use a sharp knife and make sure it’s clean between cuts. A gentle sawing motion is preferable rather than pressing down forcefully. For an extra touch, you can dust the sliced bars with a bit of powdered sugar or additional cinnamon before serving.
Flavor Variations and Personalizations
Exploring Flavor Combinations
One of the great things about Cinnamon Roll Bliss Bars is their versatility. Here are a few fun flavor variations you can try:
– Pumpkin Spice Bliss Bars: Incorporate pumpkin puree into the batter and add pumpkin spice to the cinnamon-sugar mixture for a delightful autumn twist.
– Chocolate Chip Cinnamon Roll Bars: Fold in chocolate chips into the batter for added decadence, making your bars even more indulgent.
– Nut-Free Options: For those with nut allergies, ensure that all ingredients are free from cross-contamination. You can also substitute any nut-derived products with safe alternatives.
Nutritional Information
Caloric Breakdown of Cinnamon Roll Bliss Bars
For those mindful of their dietary intake, a single Cinnamon Roll Bliss Bar (assuming 16 bars from this recipe) contains approximately 200 calories. This can vary based on specific ingredient choices and portion sizes, so it’s always a good idea to calculate based on your modifications.
Balancing Treats with Nutrition: Enjoying in Moderation
While treats like Cinnamon Roll Bliss Bars are delicious, enjoying them in moderation is key to a balanced diet. Pair these bars with a healthy breakfast or serve them as a dessert option after a nutritious meal to maintain balance in your eating habits.
Conclusion
Cinnamon Roll Bliss Bars are a scrumptious way to enjoy the classic flavors of cinnamon rolls in a convenient bar format. Whether served warm, drizzled with glaze, or enjoyed at room temperature, these bars are sure to please any crowd. The straightforward recipe and the flexibility of ingredients make it a must-try for both novice and experienced bakers alike. Embrace the warmth and sweetness of these delightful bars, and savor every bite.