Introduction
If you’re searching for a delicious and healthy dinner option that doesn’t compromise on flavor or texture, look no further than Crunchy Pita Crusted Chicken. This dish combines the lean protein of chicken breast with the delightful crunch of whole wheat pita, making it a satisfying meal that appeals to both adults and children alike. The crispy crust adds an enticing texture that elevates the chicken, while the carefully selected spices infuse each bite with a burst of flavor.
What sets this recipe apart is its focus on health without sacrificing taste. By using whole wheat pita instead of traditional breadcrumbs, you not only enhance the crunch factor but also incorporate the benefits of whole grains into your meal. Additionally, the chicken breast, known for its high protein content and low fat, makes this dish an excellent choice for those pursuing a healthier lifestyle. The marriage of a crispy exterior and tender, juicy chicken is what makes Crunchy Pita Crusted Chicken a standout in any dinner rotation.
The Benefits of Crunchy Pita Crusted Chicken
When it comes to nutritional advantages, Crunchy Pita Crusted Chicken checks all the boxes. Chicken breast is a powerhouse of protein, providing essential amino acids that are crucial for muscle repair and growth. It is also low in fat, making it a popular choice among health-conscious eaters. The inclusion of whole wheat pita not only adds a satisfying crunch but also contributes dietary fiber, which is known to support digestive health and promote satiety.
One of the key components of this recipe is the buttermilk or yogurt used for marinating the chicken. This ingredient serves a dual purpose: it tenderizes the meat, resulting in a juicy and succulent chicken, while also imparting a subtle tangy flavor that complements the spices beautifully. The combination of these ingredients ensures that you enjoy a meal that is as nourishing as it is delicious.
Ingredients Breakdown
To create the perfect Crunchy Pita Crusted Chicken, you’ll need a handful of essential ingredients, each playing a vital role in the recipe. Here’s a closer look at what you’ll need:
– Chicken Breasts: The star of the show, chicken breasts are rich in protein and provide the foundation for this dish. Opt for skinless chicken breasts for a healthier choice.
– Whole Wheat Pita: This ingredient replaces conventional breadcrumbs, offering a fiber-rich alternative that contributes to the crunchy texture. Whole wheat pita is a whole grain, making it a more nutritious option.
– Buttermilk or Yogurt: Serving as the marinating agent, buttermilk or yogurt not only helps to tenderize the chicken but also adds moisture and flavor. The acidity in these dairy products breaks down the proteins in the chicken, resulting in a more tender bite.
– Spices (Garlic Powder, Onion Powder, Paprika, Oregano): A blend of spices enhances the flavor profile of the chicken. Garlic powder and onion powder lend aromatic depth, while paprika adds a touch of smokiness and vibrant color. Oregano brings an earthy note that rounds out the seasoning.
– Olive Oil: A source of healthy fat, olive oil is used for cooking and helps to achieve that desired crispiness on the outside. It also adds a layer of flavor that complements the spices.
Preparation Steps for Crunchy Pita Crusted Chicken
Now that you have a clear understanding of the ingredients and their benefits, it’s time to dive into the preparation steps that will lead you to a perfectly cooked Crunchy Pita Crusted Chicken.
Preheating the Oven
Begin by preheating your oven to 400°F (200°C). The right temperature is crucial for achieving an evenly cooked, crispy crust. A hot oven ensures that the pita crust will become golden brown and crunchy while keeping the chicken moist and tender inside.
Importance of Temperature for Even Cooking
Consistent oven temperature is key in this recipe. If your oven is not preheated adequately, it may lead to uneven cooking. You want to achieve a perfect balance where the chicken is cooked through without drying out, and the crust becomes irresistibly crunchy.
Recommendations for Greasing the Baking Sheet
While the chicken will be coated in a flavorful crust, it’s important to grease the baking sheet to prevent sticking. A light coating of olive oil or cooking spray will do the trick. This step ensures that the chicken can be easily removed after baking and helps achieve that desired crispy texture.
Preparing the Pita Crust
To create the pita crust, start by breaking the whole wheat pita into smaller pieces. This can be done by tearing the pita by hand or using a food processor for a finer texture. The goal is to create a coarse crumb that will adhere to the chicken. Once the pita is prepared, combine it with the spices in a mixing bowl. This ensures that the flavors are evenly distributed throughout the crust.
Next, prepare the chicken by marinating it in buttermilk or yogurt for at least 30 minutes. This step is essential for infusing flavor and ensuring tenderness. After marinating, remove the chicken from the buttermilk, allowing any excess liquid to drip off before coating it in the pita crumb mixture. Press down gently to ensure the crumbs adhere well to the chicken.
By following these initial steps, you’re well on your way to enjoying a delicious meal that is both satisfying and healthy. Stay tuned for the next part of the recipe, where we will explore the final cooking steps and tips for serving this delightful dish.
{{image_2}}
Step-by-Step Guide on Processing Pita Bread
To create the deliciously crunchy crust for your chicken, start by processing the pita bread. Use a food processor to achieve the perfect texture. Here’s how to do it:
1. Choose Your Pita: Use plain, whole wheat, or flavored pita bread based on your preference. Each will give a slightly different taste to the crust.
2. Cut the Pita: Tear the pita into smaller pieces, about 1-2 inches in size. This will help your food processor handle the bread more easily.
3. Blend Until Crumbly: Place the pita pieces in the food processor. Pulse the bread until you achieve a fine crumb consistency. Avoid over-processing as this can turn the breadcrumbs into a paste. You want a sandy texture that will provide a satisfying crunch to your chicken.
4. Season the Crumbs: For added flavor, consider mixing in some dried herbs like oregano, thyme, or garlic powder into the crumbs before coating the chicken.
Importance of Achieving the Right Crumb Consistency
The consistency of the pita crumbs is crucial for the final texture of the dish. If the crumbs are too fine, they will not provide the necessary crunch, and the chicken may end up soggy. Conversely, if the crumbs are too coarse, they may not adhere well to the chicken, resulting in uneven coating. Strive for a mixture that resembles coarse sand, ensuring each piece of chicken gets a deliciously crispy outer layer.
Marinating the Chicken
Marinating chicken is an essential step that infuses flavor and helps to tenderize the meat. Here’s how to marinate your chicken effectively:
1. Choose Your Marinade: For this recipe, a simple blend of yogurt, lemon juice, garlic, salt, and pepper works wonders. The yogurt acts as a tenderizer while imparting a creamy texture and tangy flavor.
2. Marinating Time: Ideally, allow the chicken to marinate for at least 1 hour, but for the best results, aim for 4-6 hours or even overnight. This extended time allows the flavors to penetrate deeply into the chicken.
3. Even Coverage: To ensure even coverage of the marinade, use a large resealable plastic bag. Place the chicken in the bag, pour the marinade over it, and seal. Massage the bag gently to coat each piece thoroughly.
Coating the Chicken
Once the chicken has marinated, it’s time to coat it for that irresistible crunch:
1. Prepare Your Dredging Station: Set up three shallow bowls. The first for the marinated chicken, the second for seasoned flour (optional), and the third for the processed pita crumbs.
2. Dredging Process:
– Step 1: Remove a piece of chicken from the marinade, allowing excess marinade to drip off.
– Step 2: (Optional) Dredge the chicken in flour. This step helps the pita crumbs adhere better, but you can skip it for a gluten-free option.
– Step 3: Press the chicken into the pita crumbs, ensuring it is fully coated. Press firmly to help the crumbs stick.
3. Repeat: Continue this process until all chicken pieces are coated.
Importance of Each Step in Achieving Crunchiness
Each step in the coating process plays a vital role in achieving that desired crunch. The marinade tenderizes the chicken, while the flour (if used) creates a base for the crumbs to adhere to. The final pressing of the pita crumbs onto the chicken ensures that as it cooks, a crunchy crust forms, contrasting beautifully with the juicy interior of the meat.
Baking the Chicken
Now that your chicken is coated, it’s time to bake it to perfection:
1. Preheat the Oven: Preheat your oven to 400°F (200°C). This temperature is ideal for crisping the coating while ensuring the chicken cooks through.
2. Arrange on a Baking Sheet: Line a baking sheet with parchment paper and place the coated chicken pieces on it. Ensure there’s space between each piece for even cooking and browning.
3. Baking Time: Bake the chicken for about 20-25 minutes, flipping halfway through. The exact time will depend on the thickness of your chicken pieces.
4. Checking Doneness: To ensure your chicken is cooked through, use a meat thermometer. The internal temperature should reach 165°F (75°C). If you don’t have a thermometer, cut into the thickest part of the chicken; the juices should run clear, and the meat should be opaque.
Serving Suggestions
To complement your Crunchy Pita Crusted Chicken, consider these delightful serving suggestions:
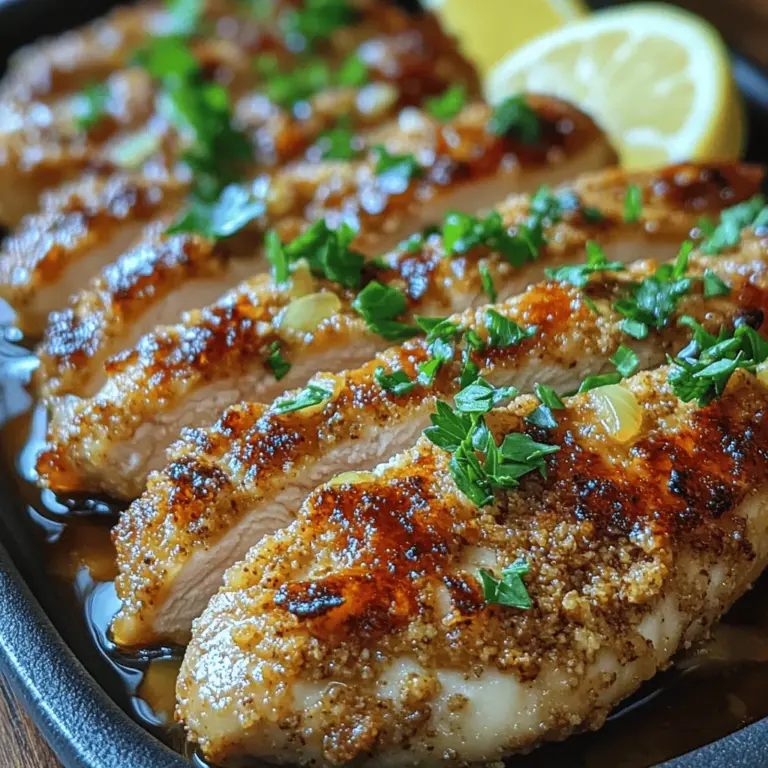
1. Garnishing: Fresh parsley adds a vibrant touch to your dish. Chop it finely and sprinkle it over the chicken right before serving for a burst of color and freshness.
2. Lemon Wedges: Serve lemon wedges alongside the chicken. A squeeze of fresh lemon juice brightens the flavors, cutting through the richness and enhancing the overall taste.
3. Recommended Side Dishes:
– Mediterranean Salad: A light salad with cucumbers, tomatoes, olives, and feta is a perfect accompaniment.
– Roasted Vegetables: Seasoned roasted vegetables such as zucchini, bell peppers, and carrots provide a colorful and nutritious side.
– Quinoa or Couscous: These grains offer a hearty base to soak up the flavors of the chicken.
Nutritional Information
Crunchy Pita Crusted Chicken is not only delicious but also a balanced meal option. Here’s an overview of the nutritional profile per serving (assuming four servings):
– Calories: Approximately 350-400 calories
– Protein: 30-35 grams
– Fat: 10-15 grams
– Carbohydrates: 30-35 grams
– Fiber: 2-3 grams
Health Benefits of the Dish
This dish offers numerous health benefits as part of a balanced diet. The chicken provides a high-quality source of lean protein, essential for muscle repair and growth. The use of yogurt in the marinade adds probiotics, which are beneficial for gut health. Furthermore, pairing it with fresh vegetables and grains enhances the meal’s fiber content and overall nutritional value, making it a satisfying option for any time of the day.
Conclusion
The Crunchy Pita Crusted Chicken is a standout dish that combines a crispy texture, rich flavors, and health benefits, making it a must-try for any home cook. With its easy preparation steps and the versatility to alter flavors according to your preferences, this recipe can quickly become a family favorite.
Encouraging you to try making this delicious dish at home will not only provide a wholesome meal but also allow you to enjoy the satisfaction of creating something truly delicious. Feel free to experiment with different herbs and spices in the marinade or the coating mixture to customize it to your taste. Whether served for a weeknight dinner or a special occasion, this chicken is sure to impress. Enjoy your culinary adventure!
