Garlic Butter Bliss Knots Recipe: A Delightful Addition to Your Culinary Repertoire
There’s something truly special about homemade bread that transcends the mere act of baking. The aroma wafting through your kitchen, the warmth enveloping your home, and the joy it brings to family and friends all contribute to a heartwarming experience. Among the myriad of bread recipes, Garlic Butter Bliss Knots stand out as a comforting and delectable addition that elevates any meal or gathering. These soft, buttery knots, infused with the rich flavors of garlic and herbs, are perfect for sharing at family dinners, holiday feasts, or casual get-togethers.
What makes Garlic Butter Bliss Knots particularly appealing is their simplicity. With just a handful of everyday ingredients that can often be found in most kitchens, this recipe invites everyone from novice bakers to seasoned chefs to partake in the joy of bread-making. Whether you’re looking to impress guests or simply enjoy a warm, homemade treat with your evening meal, these knots are sure to become a staple in your culinary repertoire.
Understanding the Ingredients
To embark on this delightful baking journey, it’s essential to familiarize yourself with the key ingredients that make Garlic Butter Bliss Knots so irresistible.
All-Purpose Flour:
The foundation of our dough, all-purpose flour provides the structure needed to create fluffy knots. Its balanced protein content ensures that the bread has a light and airy texture while still being sturdy enough to hold its shape.
Instant Yeast:
Yeast is a critical component in bread-making, acting as a leavening agent that transforms our dough from dense to delightful. Instant yeast, in particular, simplifies the process as it requires no proofing—allowing for a quicker preparation time. When mixed with warm water and sugar, it activates and begins to produce carbon dioxide, which causes the dough to rise.
Sugar:
While often associated with sweetness, sugar plays a vital role in bread-making beyond flavor enhancement. It helps activate the yeast, providing it with the necessary food to grow and produce those characteristic air bubbles. This results in a light and airy texture in the final product.
Salt:
Salt is not just a flavor enhancer; it’s also crucial for yeast activation. It regulates yeast growth, ensuring that your dough rises at a steady pace. Moreover, it balances the flavors in your bread, creating a harmonious blend of savory notes.
Olive Oil:
Incorporating olive oil into the dough contributes to its texture and flavor. It creates a tender crumb and adds richness, making each knot even more enjoyable. Additionally, olive oil provides a healthier fat option compared to butter alone.
Butter and Garlic:
The stars of the show, butter and garlic, come together to create the signature flavor profile of Garlic Butter Bliss Knots. Melted butter brushed over the knots before serving infuses them with a rich, savory taste, while fresh garlic adds a delightful aromatic punch that elevates the overall experience.
Fresh Parsley:
To add a touch of brightness and freshness, fresh parsley is sprinkled over the knots. This herb not only enhances the visual appeal but also complements the garlic, creating a well-rounded flavor profile.
Optional Ingredients:
For those looking to customize their Garlic Butter Bliss Knots, consider adding garlic powder for an extra kick or red pepper flakes for a hint of heat. These optional ingredients allow you to tailor the knots to your taste preferences, making them even more versatile.
Step-by-Step Instructions for Garlic Butter Bliss Knots
Now that we’ve covered the essential ingredients, let’s dive into the step-by-step instructions for making Garlic Butter Bliss Knots.
Preparing the Yeast Mixture:
Start by measuring out warm water—ideally between 100°F to 110°F (37°C to 43°C)—and combining it with the sugar and instant yeast in a mixing bowl. The correct water temperature is crucial; if it’s too hot, it can kill the yeast, while water that’s too cold will not activate it effectively. Give the mixture a gentle stir and allow it to sit for about 5–10 minutes. During this time, you should see bubbles forming on the surface, indicating that the yeast is alive and well. This frothing process is a good sign that your yeast is ready to work its magic on the dough.
Mixing the Dough:
Next, in a large mixing bowl, combine the activated yeast mixture with the olive oil and salt. Gradually add in the all-purpose flour, one cup at a time, mixing with a wooden spoon or spatula to combine. As you add the flour, you’ll notice the dough beginning to come together. The goal here is to achieve a cohesive dough that isn’t too sticky, so feel free to adjust the amount of flour based on your dough’s consistency.
Kneading the Dough:
Once you’ve mixed the ingredients together, it’s time to knead the dough. Dust your work surface with a little flour and transfer the dough onto it. Kneading is a crucial step that helps develop gluten, giving your bread structure and chewiness. To knead, fold the dough over itself, then push it away with the heel of your hand. Rotate the dough a quarter turn and repeat this process for about 8–10 minutes. You’ll know the dough is ready when it feels smooth and elastic, bouncing back when you poke it with a finger.
Allowing the Dough to Rise:
After kneading, place the dough in a lightly greased bowl and cover it with a clean kitchen towel or plastic wrap. Let it rise in a warm, draft-free area for about 1 to 1.5 hours, or until it has doubled in size. This rising period is essential, as it allows the yeast to work, creating the airiness that makes the knots so delightful.
Stay tuned for the next part, where we will shape the dough into knots and prepare them for their final rise before baking.
{{image_2}}
Rising Process and Optimal Conditions
The rising process is a crucial step in creating soft, fluffy Garlic Butter Bliss Knots. Yeast is at the heart of this process, and it thrives in warm, moist environments. To achieve optimal dough expansion, aim for a warm spot in your kitchen, ideally around 75°F to 80°F (24°C to 27°C). If your kitchen is cooler, consider placing the dough in an oven that has been preheated for a couple of minutes and then turned off. Cover the bowl with a damp cloth or plastic wrap to retain moisture.
Visual Cues for Dough Rising: You’ll know your dough is ready when it has visibly doubled in size. This typically takes about 1 to 2 hours, depending on your environment. To check, gently press your finger into the dough; if the indentation remains, it’s ready to be shaped.
Shaping the Knots
Tips for Dividing and Rolling the Dough into Ropes
Once your dough has risen, it’s time to shape it into blissful knots. Begin by gently deflating the dough on a lightly floured surface. Cut the dough into equal portions, about 12 to 16 pieces, depending on how large you want your knots. Each piece should weigh around 2 ounces (57 grams) for uniformity.
To roll the dough into ropes, take each piece and stretch it gently, rolling it back and forth on the floured surface until it reaches about 8 to 10 inches in length. Aim for a thickness of approximately half an inch. The goal is to create a smooth, even rope that will hold its shape when tied into a knot.
Step-by-Step Visual Guide on Tying the Knots
1. Create the Rope: Start with your rolled-out dough rope.
2. Form the Loop: Take the ends of the rope and cross them over each other, forming a loop.
3. Wrap Around: With the end that is now on top, wrap it around the base of the loop.
4. Tuck Under: Bring the end through the loop you created to form a knot.
5. Adjust and Tighten: Gently pull both ends to tighten the knot, ensuring it looks neat and holds its shape.
Repeat this process with the remaining pieces of dough and place each knot onto a greased baking sheet or one lined with parchment paper. Leave enough space between each knot, as they will expand during the second rise and baking.
Preparing the Garlic Butter Mixture
Creating the Garlic Butter Mixture
The garlic butter mixture is what elevates these knots from simple bread to a flavor-packed delight. Melt ½ cup (1 stick) of unsalted butter in a small saucepan over low heat. Once melted, add 3-4 cloves of minced garlic, allowing it to simmer for a couple of minutes until fragrant. You can also add a pinch of salt, freshly cracked black pepper, and finely chopped parsley or oregano for added flavor.
Balance of Flavors and Optional Spice Adjustments
This garlic butter mixture should be rich and aromatic, perfectly complementing the soft dough. If you prefer a little heat, a pinch of red pepper flakes or a dash of cayenne pepper can be added to the butter while it simmers. Taste the mixture before brushing it on the knots; it should be savory and slightly garlicky without overpowering the bread itself.
Baking the Knots
Oven Temperature and Its Significance
Preheat your oven to 375°F (190°C) to ensure even baking. A hotter oven helps achieve a golden-brown finish while keeping the inside soft and fluffy. If the temperature is too low, the knots may end up being pale and doughy.
Timing for Baking and Visual Cues for Doneness
Bake the knots for 15 to 20 minutes, or until they are golden brown. The tops should be slightly crisp, while the insides remain tender. To check for doneness, tap the bottom of a knot; it should sound hollow. If you have a kitchen thermometer, the internal temperature should reach about 190°F (88°C).
Final Touches
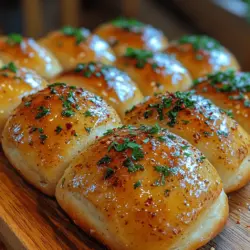
Brushing with Remaining Garlic Butter
Once the knots are out of the oven, immediately brush them with the remaining garlic butter mixture. This step is essential as it adds a glossy finish and enhances the garlic flavor. For an extra touch, sprinkle a pinch of sea salt on top before serving.
Presentation Tips for Serving the Knots Warm
Serve the Garlic Butter Bliss Knots warm for the best experience. Arrange them on a large platter, garnished with fresh herbs such as parsley or basil, and a small bowl of marinara or dipping sauce on the side for added flavor. This not only makes for an appealing presentation but also invites guests to enjoy them right away.
Nutritional Information
Garlic Butter Bliss Knots are not just delicious; they also contain ingredients that provide nutritional benefits. The knots are made from simple ingredients: flour, yeast, garlic, and butter.
Overview of Nutritional Benefits
– Flour: Provides carbohydrates for energy and essential nutrients like B vitamins.
– Garlic: Known for its health benefits, garlic can boost the immune system and has anti-inflammatory properties.
– Butter: While high in calories and fat, it does provide fat-soluble vitamins A, D, and E.
Discussion on Portion Sizes
While these knots are irresistible, moderation is key. Each knot can be counted as a treat, and serving sizes can be adjusted based on dietary needs. Consider enjoying one or two with a balanced meal, such as a salad or soup, to create a wholesome dining experience.
Pairing Suggestions
Ideal Meals and Occasions
Garlic Butter Bliss Knots are incredibly versatile and complement a variety of dishes. They pair excellently with:
– Pasta Dishes: Serve alongside marinara or Alfredo pasta for a comforting meal.
– Soups: Their fluffy texture is perfect for soaking up delicious broth.
– Salads: Offer a hearty addition to fresh greens, providing a satisfying balance.
Perfect for Gatherings and Parties
These knots are ideal for gatherings, parties, or cozy family dinners. Their appealing aroma and buttery flavor make them a hit among guests. Serve them as an appetizer or a side dish and watch them disappear quickly!
Suggested Beverages
To elevate your meal, consider serving Garlic Butter Bliss Knots with the following beverages:
– Wine: A glass of crisp white wine, such as Sauvignon Blanc or a light red like Pinot Noir, pairs beautifully.
– Sparkling Water: For a non-alcoholic option, sparkling water with a slice of lemon is refreshing and enhances the meal.
Conclusion
Making Garlic Butter Bliss Knots is not just about enjoying a delicious treat; it’s about the experience of baking and sharing with loved ones. The aroma of garlic and butter filling your home, the joy of watching dough rise, and the satisfaction of tying each knot create a delightful culinary journey.
Encourage your friends and family to join in the baking process, turning it into a fun activity filled with laughter and creativity. Whether enjoyed as a side dish, at a gathering, or as a comforting snack, these knots are sure to bring joy to the table. Embrace the process of baking, and savor the warm, buttery results that follow!