Introduction
In the realm of desserts, finding a balance between indulgence and health can often feel like a daunting task. Many people struggle with the desire for sweet treats while maintaining a commitment to nutritious eating. However, with the Guilt-Free Chocolate Peanut Fudge, you can satisfy your sweet tooth without compromising your health goals. This recipe is not only simple to prepare but also packed with wholesome ingredients that provide a deliciously rich flavor.
The idea of guilt-free desserts has gained immense popularity in recent years as more individuals become conscious of their dietary choices. This chocolate peanut fudge perfectly embodies this trend, allowing you to indulge in a delectable treat that is both satisfying and nourishing. In this article, we will explore the benefits of each ingredient, the step-by-step process of making this delightful treat, and the joy of enjoying a dessert that aligns with your health aspirations.
Understanding the Ingredients
Exploring Natural Peanut Butter
Natural peanut butter serves as the cornerstone of this fudge recipe, offering a creamy texture and a robust flavor that complements the rich chocolate perfectly. When selecting peanut butter, it’s crucial to choose a product made from just peanuts (and perhaps a pinch of salt) to avoid added sugars and unhealthy oils. This type of peanut butter retains its healthy fats and protein, making it a more nutritious choice.
Peanut butter is not only delicious but also comes with a myriad of health benefits. It is an excellent source of protein, which is essential for muscle repair and growth, as well as healthy fats that can boost heart health. Additionally, it contains vitamins and minerals such as Vitamin E, magnesium, and potassium.
When it comes to texture, you can choose between creamy and crunchy peanut butter depending on your preference. Creamy peanut butter yields a smooth fudge, while crunchy varieties add an interesting texture that can elevate the overall experience of the fudge.
The Role of Unsweetened Cocoa Powder
Cocoa powder is the second star of this guilt-free recipe, contributing to its rich chocolate flavor without the added sugar found in many commercial chocolate products. Unsweetened cocoa powder is packed with antioxidants and has been linked to various health benefits, including improved heart health and enhanced mood.
Using cocoa powder enhances the depth of flavor in the fudge while allowing you to control the sweetness. Unlike traditional chocolate bars that often contain high amounts of sugar, cocoa powder allows you to enjoy the essence of chocolate without the guilt. Furthermore, it can provide a subtle bitterness that balances the sweetness from other ingredients, making the fudge incredibly satisfying.
Sweetening with Pure Maple Syrup
When it comes to sweeteners, pure maple syrup is an excellent choice for this recipe as it offers a unique flavor profile and a lower glycemic index compared to traditional refined sugar. This means that it causes a slower rise in blood sugar levels, making it a better option for those who are mindful of their sugar intake.
Maple syrup is also rich in antioxidants and contains essential minerals like manganese and zinc, which can support overall health. Its natural sweetness pairs perfectly with the flavors of peanut butter and cocoa, ensuring that the fudge is indulgent without being overpoweringly sweet.
Coconut Oil: A Healthy Fat Choice
Coconut oil is another key ingredient in this fudge recipe, providing a healthy fat source that can enhance both texture and flavor. Unlike many other oils, coconut oil is high in medium-chain triglycerides (MCTs), which are easily digestible and can be quickly converted into energy by the body.
In addition to its health benefits, coconut oil adds a creamy richness to the fudge, helping to create a smooth and velvety texture. It also helps the fudge set properly, ensuring that it holds its shape when cut into squares.
The Importance of Vanilla Extract
While it may seem like a small addition, quality vanilla extract plays a significant role in enhancing the overall flavor of the fudge. The complex flavor profile of vanilla can elevate the taste of the fudge, making it more aromatic and enjoyable.
When selecting vanilla extract, it’s best to opt for pure vanilla rather than artificial varieties. Pure vanilla extract is made from real vanilla beans and contains natural compounds that contribute to its rich flavor. The subtle warmth of vanilla complements the chocolate and peanut butter, creating a harmonious blend that is sure to please your palate.
Incorporating Sea Salt
Adding a pinch of sea salt to the fudge might seem counterintuitive, but it serves an essential purpose. Salt enhances sweetness, balancing the flavors and elevating the overall taste experience. The contrast between the salty and sweet elements of the fudge creates a delightful complexity that keeps you coming back for more.
Sea salt is also a healthier alternative to regular table salt, as it contains essential minerals and is less processed. The rough texture of sea salt can provide a pleasant crunch, making each bite of fudge even more satisfying.
Optional Add-ins for Extra Flavor and Texture
To take your Guilt-Free Chocolate Peanut Fudge to the next level, consider incorporating optional add-ins. Dark chocolate chips are an excellent choice, adding richness and depth to the fudge. They also provide additional health benefits, as dark chocolate is known for its high antioxidant content.
Chopped nuts can be another great addition, offering a nutritional boost and added crunch. Walnuts, almonds, or pecans can enhance the flavor and texture of the fudge, making it even more enjoyable. These add-ins not only enrich the taste but also contribute to the overall healthiness of the dessert.
Step-by-Step Guide to Making Guilt-Free Chocolate Peanut Fudge
Before diving into the preparation of this delicious fudge, it’s essential to ensure that you have everything you need. Start by preparing your baking dish, which will hold the fudge as it sets. A square or rectangular pan lined with parchment paper is ideal for easy removal and cutting.
1. Choose the Right Baking Dish: Select an 8×8 inch or 9×5 inch baking dish, depending on how thick you want your fudge to be. Line the dish with parchment paper, allowing some overhang for easy removal later. This step is crucial as it helps in lifting the fudge out of the pan once it has set.
2. Gather Your Ingredients: Make sure you have all the necessary ingredients on hand: natural peanut butter, unsweetened cocoa powder, pure maple syrup, coconut oil, high-quality vanilla extract, and sea salt. If you’re planning to add dark chocolate chips or nuts, gather those as well.
With your baking dish prepared and ingredients assembled, you’re ready to begin creating this guilt-free indulgence. Stay tuned as we dive into the detailed steps for making the Guilt-Free Chocolate Peanut Fudge, ensuring you can enjoy a delicious treat that aligns with your health goals.
{{image_2}}
Why Parchment Paper is Essential for Easy Removal
Using parchment paper in your fudge preparation is a game-changer when it comes to easy removal. By lining your baking dish with parchment paper, you create a non-stick surface that allows the fudge to be lifted out effortlessly once it has set. This is particularly helpful when trying to achieve clean edges and perfect slices. To use parchment paper effectively, make sure to leave some overhang on the sides of the dish. This will give you a secure grip when removing the fudge, ensuring minimal breakage and a smooth transfer to your cutting board.
Tips on Greasing for Hassle-Free Serving
Even if you use parchment paper, greasing the paper lightly with a bit of coconut oil or cooking spray can enhance the non-stick effect. This helps avoid any unwanted sticking, especially around the edges, where fudge tends to cling. Apply just a thin layer; too much grease can cause the fudge surface to become oily. For those who prefer a natural option, you can also use a small amount of melted coconut oil or a neutral oil of your choice.
Mixing the Fudge Base
Techniques for Achieving a Smooth and Creamy Consistency
The key to a silky-smooth fudge lies in the mixing process. Begin by combining your main ingredients—natural peanut butter, pure maple syrup, cocoa powder, and any nut butter you’re using. Start mixing at a low speed if you’re using a stand mixer, gradually increasing to medium. This prevents any splatter and ensures even blending. The longer you mix, the creamier your fudge will become, as air will incorporate into the mixture, yielding a light and fluffy texture.
Importance of Mixing Order and Timing
When it comes to mixing, the order in which you add your ingredients can affect the final outcome. Start with the peanut butter and sweetener, mixing them until fully combined before adding the dry ingredients like cocoa powder and salt. It’s essential to give enough time for each ingredient to integrate fully before proceeding to the next. This ensures that every bite of fudge is packed with the same delicious flavor and prevents clumping.
Adding Optional Ingredients
How to Fold in Chocolate Chips and Nuts Without Overmixing
Once you have your base ready, it’s time to add any optional ingredients, such as dark chocolate chips or chopped nuts. The folding technique is crucial here; it allows you to incorporate these mix-ins without deflating the fudge. Use a spatula to gently fold the chocolate chips and nuts into the mixture. Start from the bottom of the bowl and lift the mixture over itself, turning the bowl as you mix. This helps maintain the creamy consistency while ensuring that the add-ins are evenly distributed.
Creative Variations to Customize Your Fudge
The beauty of this fudge recipe is its versatility. You can easily customize your batch with different flavors and textures. Consider adding a sprinkle of sea salt for a sweet-salty contrast, or incorporate dried fruits like cranberries or raisins for a chewy texture. For an extra crunch, try folding in some crushed pretzels or puffed quinoa. Each variation not only alters the taste but also adds unique nutritional benefits, making your fudge even more enjoyable.
Pouring and Spreading the Mixture
Tips for Achieving an Even Spread in the Baking Dish
Once your mixture is ready, pour it into the prepared baking dish. To ensure an even spread, use a spatula to gently push the fudge mixture into the corners of the pan. Start from the center and work your way outwards, smoothing the top as you go. If you find it challenging to spread, you can lightly dampen the spatula or use a piece of parchment paper to help smooth the surface without it sticking.
The Significance of a Smooth Top for Presentation
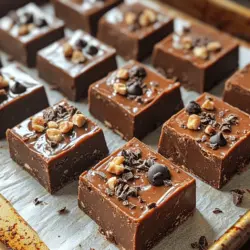
A smooth top is not just for aesthetics; it also contributes to the texture of the fudge. When the top is level and even, it allows for a cleaner cut, resulting in beautifully shaped squares or rectangles once sliced. If you like, you can finish the fudge with a light dusting of cocoa powder or some extra chocolate chips for visual appeal. This little touch can elevate the presentation, making your fudge look as good as it tastes.
Chilling for the Perfect Texture
Understanding the Chilling Process and Its Effects on Fudge
Chilling is an essential step in the fudge-making process. It allows the ingredients to set properly, resulting in the firm texture that fudge is known for. The cooling period also helps the flavors meld, enhancing the overall taste. For the best results, allow the fudge to chill in the refrigerator for at least 2-3 hours, or until it is solid throughout.
Alternative Chilling Methods for Quicker Results
If you’re short on time, consider using the freezer to expedite the chilling process. Place the fudge in the freezer for about 30-45 minutes instead of the refrigerator. However, keep a close eye on it to ensure it doesn’t freeze too hard. You want it to be firm enough to cut without being rock-solid. Once it reaches the desired firmness, you can remove it and let it sit at room temperature for a few minutes before slicing.
Cutting and Serving Your Fudge
Best Practices for Slicing Fudge Without Mess
When your fudge has set perfectly, it’s time to slice it into pieces. To achieve clean cuts, use a sharp knife that has been warmed under hot water. Wipe the knife clean between cuts to prevent any smearing, resulting in neat edges. Depending on your preference, you can cut the fudge into small squares for bite-sized snacks or larger rectangles for a more substantial treat.
Ideas for Serving Suggestions and Pairings
Serving your guilt-free chocolate peanut fudge can be a delightful experience. Consider pairing it with fresh fruits like strawberries or bananas for a refreshing contrast. A scoop of yogurt or a drizzle of almond butter can add an extra layer of flavor. For special occasions, serve the fudge alongside a rich cup of coffee or a glass of almond milk to enhance the indulgent experience.
Storing Your Guilt-Free Chocolate Peanut Fudge
Optimal Storage Conditions
To keep your fudge fresh and delicious for up to two weeks, store it in an airtight container at room temperature. However, if you live in a warm climate, refrigeration might be necessary to prevent melting. Make sure the fudge is fully cooled before sealing it in the container to avoid condensation, which can lead to a sticky texture.
How to Keep Your Fudge Fresh for Up to Two Weeks
By following optimal storage conditions, your fudge can remain fresh for up to two weeks. If you notice any signs of moisture or stickiness, it’s best to consume it sooner. Keeping it in a cool, dark place will help maintain its texture and flavor.
Understanding the Effects of Temperature on Texture
The texture of your fudge can change based on storage conditions. At room temperature, it will be soft and chewy, while refrigeration can make it firmer. If you prefer a softer fudge, allow it to sit at room temperature for a few minutes before serving. Conversely, if you enjoy a firmer texture, refrigeration is your best bet.
Refrigeration vs. Freezing
When to Choose Refrigeration and When to Freeze
Refrigeration is ideal for short-term storage, typically lasting up to two weeks. If you wish to keep your fudge for a longer period, freezing is the best option. Properly wrapped in plastic wrap and stored in an airtight container, fudge can last up to three months in the freezer.
Tips for Thawing and Enjoying Frozen Fudge
When you’re ready to enjoy your frozen fudge, remove it from the freezer and allow it to thaw in the refrigerator for several hours. This slow thawing process helps maintain the texture, ensuring your fudge doesn’t become too soft or mushy. Once thawed, you can cut it into pieces and enjoy it just like fresh fudge.
Conclusion
The Guilt-Free Chocolate Peanut Fudge recipe is a testament to the fact that healthy desserts can be both satisfying and delicious. By using wholesome ingredients that contribute to your well-being, you can indulge in a sweet treat without the guilt. This recipe not only fits seamlessly into a balanced diet but also allows for creativity in its preparation. Whether you enjoy it as a snack, dessert, or a special treat for guests, this fudge is sure to become a favorite in your kitchen. Embrace the joy of creating a healthy dessert that doesn’t compromise on taste, and revel in the satisfaction of treating yourself guilt-free.