Introduction
The world of baking is filled with delightful aromas and textures, and one of the most cherished treats within this realm is sweet bread. Popular across many cultures, sweet breads have a unique ability to evoke warmth and comfort, often reminding us of home and family gatherings. The allure of homemade bread lies not only in its delicious taste but also in the joy of creating something from scratch. There’s something immensely satisfying about kneading dough, watching it rise, and finally pulling a golden loaf from the oven, filling your home with an irresistible fragrance.
Today, we invite you to explore the delightful recipe for Heavenly Sweet Condensed Milk Bread. This exquisite bread combines simplicity with rich flavors, making it a perfect option for family breakfasts, afternoon snacks, or even as a centerpiece for festive gatherings. With its tender crumb and sweet undertones, this bread transcends the ordinary, turning a simple meal into a special occasion.
The Allure of Sweet Breads
Sweet breads hold a special place in culinary traditions worldwide. From fluffy Hawaiian rolls to the aromatic challah of Jewish heritage, each culture has its interpretation of sweet bread, often infused with local flavors and ingredients. These breads not only serve as a delicious treat but also play a significant role in cultural celebrations and rituals. For instance, sweet bread is commonly prepared during holidays and family gatherings, symbolizing togetherness and sharing.
The comforting and nostalgic feelings associated with homemade sweet bread are undeniable. The soft texture and sweet aroma can transport us back to our childhood, evoking memories of family kitchens filled with laughter and warmth. Whether it’s the smell of freshly baked cinnamon rolls on a Sunday morning or the sight of a loaf cooling on the counter, sweet breads have a unique way of enhancing our dining experiences.
Moreover, sweet breads elevate ordinary meals into something truly special. They can be enjoyed plain, paired with butter, or served with various spreads and toppings. Their versatility means they can complement savory dishes or stand alone as a delightful snack. In essence, sweet breads offer a heartwarming experience that brings people together, making them an integral part of many culinary traditions.
Understanding the Ingredients
To create the Heavenly Sweet Condensed Milk Bread, it’s essential to understand the key ingredients that contribute to its unique flavor and texture. Each component plays a crucial role in the overall success of the bread.
All-Purpose Flour
All-purpose flour is the foundation of this bread, providing the structure and body needed to create a light and fluffy loaf. Its versatility makes it a staple in many baking recipes, as it contains a balanced amount of protein that allows for good gluten development without being too heavy. This is crucial for achieving the soft and tender crumb characteristic of sweet breads.
Sweetened Condensed Milk
One of the standout ingredients in this recipe is sweetened condensed milk. It not only adds sweetness but also contributes moisture, resulting in a rich and tender texture. The creamy consistency of condensed milk enhances the flavor profile, making each bite indulgently sweet without the need for excessive sugar.
Warm Milk
Using warm milk in the recipe is essential for activating the yeast. Yeast thrives in a warm environment, and the warmth helps to jumpstart the fermentation process. This step is vital for achieving a good rise and developing the fluffy texture we desire in our sweet bread.
Butter
Melted unsalted butter enriches the flavor and texture of the bread. It adds a layer of richness that complements the sweetness of the condensed milk and helps create a soft, tender crumb. Butter also contributes to the bread’s overall moisture, preventing it from becoming dry.
Sugar
While sweetened condensed milk provides a significant amount of sweetness, additional sugar is included in the recipe to enhance the flavor and to serve as food for the yeast. This dual role is essential, as it supports the fermentation process while also ensuring a pleasantly sweet final product.
Eggs
Eggs are a key ingredient in many bread recipes, providing richness and acting as a binding agent. In the case of Heavenly Sweet Condensed Milk Bread, eggs contribute to the overall structure and moisture, ensuring that each slice is deliciously tender.
Active Dry Yeast
Active dry yeast is the leavening agent that allows the bread to rise. It undergoes a fermentation process, producing carbon dioxide that creates air pockets in the dough, leading to a light and airy texture. Properly activating the yeast is critical for the success of the bread, as it determines how well the dough will rise.
Vanilla Extract and Salt
Vanilla extract is added to enhance the overall flavor profile, infusing the bread with a warm, sweet aroma. On the other hand, salt is crucial for balancing the sweetness and enhancing the flavor of the other ingredients. It also plays a role in strengthening the gluten structure, contributing to the bread’s texture.
Optional Add-ins
To personalize your Heavenly Sweet Condensed Milk Bread, consider adding optional ingredients such as desiccated coconut or chocolate chips. These add-ins can elevate the flavor and texture, allowing you to tailor the recipe to your preferences and make each loaf unique.
Step-by-Step Guide to Making Heavenly Sweet Condensed Milk Bread
Creating the Heavenly Sweet Condensed Milk Bread is a rewarding experience that begins with a few simple steps. Follow these detailed instructions to ensure a successful bake.
Preparing the Yeast
The first step in making this delicious bread is to prepare the yeast. Start by measuring out warm milk (about 110°F or 43°C) and pouring it into a mixing bowl. The warmth of the milk is essential for activating the yeast, as it encourages the yeast cells to wake up and begin their fermentation process.
Sprinkle the active dry yeast over the warm milk and let it sit undisturbed for about 5-10 minutes. During this time, you should see the yeast begin to foam and bubble, indicating that it is active and ready to use. This step is crucial; if your yeast doesn’t foam, it may be inactive, and you will need to start again with fresh yeast.
Mixing Wet Ingredients
Once the yeast is activated, it’s time to mix the wet ingredients. In a separate bowl, combine the sweetened condensed milk, melted butter, and eggs. Whisk the mixture until it is smooth and well combined. The sweetened condensed milk will add sweetness and moisture, while the melted butter will enrich the dough. Make sure the butter has cooled slightly before mixing to avoid cooking the eggs.
Combining Ingredients
Next, gradually add the wet mixture to the activated yeast in the mixing bowl. Stir gently to combine. Now, it’s time to incorporate the dry ingredients. In a separate bowl, sift together the all-purpose flour, sugar, and salt. Gradually add the dry ingredients to the wet mixture, stirring until a shaggy dough forms. The texture should be soft and slightly sticky but not overly wet.
Kneading the Dough
Kneading is a critical step in bread-making that helps develop the gluten structure, resulting in a light and airy loaf. Turn the dough out onto a lightly floured surface and begin kneading. Use the heels of your hands to push the dough away from you, then fold it back over itself. Rotate the dough a quarter turn and repeat the process.
Knead the dough for about 8-10 minutes, or until it becomes smooth and elastic. You can add a small amount of flour if the dough is too sticky, but be careful not to over-flour, as this can result in a dense loaf. A well-kneaded dough should bounce back when poked and feel soft to the touch.
After kneading, shape the dough into a ball and place it in a lightly greased bowl, turning it to coat all sides. Cover the bowl with a damp cloth or plastic wrap and let it rise in a warm, draft-free area until it doubles in size, typically about 1-2 hours.
This marks the beginning of your journey to creating the Heavenly Sweet Condensed Milk Bread. Stay tuned for the next steps, where we will guide you through shaping the dough, the second rise, and the baking process that leads to a beautifully golden and aromatic loaf.
{{image_2}}
Heavenly Sweet Condensed Milk Bread Recipe: Crafting Perfection
First Rise
Allowing the dough to rise is a crucial step in bread-making that contributes significantly to the final texture and flavor of your Heavenly Sweet Condensed Milk Bread. This first rise, also known as bulk fermentation, allows the yeast to feed on the sugars in the dough, producing carbon dioxide, which causes the dough to expand and develop its airy structure.
To create an ideal environment for the dough to rise, consider the following tips:
1. Warm Environment: Yeast thrives in warm conditions. Aim for a room temperature of around 75°F to 80°F (24°C to 27°C). If your kitchen is cool, you can place the dough in an oven that’s turned off but has the light on or cover it with a warm, damp cloth to retain moisture and warmth.
2. Humidity: A slightly humid environment helps prevent the dough from drying out. If you live in a particularly dry climate, you might consider placing a small bowl of water in the oven with the dough to create a more humid space.
3. Patience: Allow the dough to rise until it doubles in size. This typically takes about 1 to 2 hours, depending on the room temperature and the strength of your yeast. It’s important not to rush this process; a well-risen dough ensures a lighter, fluffier loaf.
Shaping the Loaf
Once the dough has risen, it’s time to shape it into a loaf. Shaping is not just about aesthetics; it significantly affects how the bread rises and bakes. Here’s how to shape your dough effectively:
1. Gently Deflate: Begin by gently punching down the dough to release excess gas. This step is essential for redistributing the yeast and creating a uniform crumb structure in the final loaf.
2. Pre-shape: Turn the dough onto a lightly floured surface. Use your hands to form it into a rough rectangle, ensuring the surface remains smooth. Let it rest for about 10 minutes; this allows the gluten to relax, making the next shaping easier.
3. Final Shape: For a classic loaf shape, flatten the dough into a rectangle again, then fold the top third down to the center and the bottom third up. Roll it tightly from the short end, pinching the seams as you go to create surface tension. This tension helps the loaf rise well in the oven.
4. Pan Placement: Place the shaped loaf seam-side down in a greased loaf pan. This positioning helps maintain the shape during the second rise.
Second Rise
The second rise, or proofing, is just as important as the first. It allows the dough to relax and expand further, resulting in a light, airy texture. Here’s what to keep in mind for the second rise:
1. Duration and Observation: Allow the dough to rise again until it has doubled in size, which usually takes about 30 to 60 minutes. Keep an eye on the dough; it should feel puffy and spring back slowly when gently poked.
2. Covering: Cover the loaf with a damp cloth or plastic wrap to prevent it from drying out during this rise.
3. Temperature: Similar to the first rise, find a warm, draft-free location for the loaf. This rise is typically shorter than the first, so be vigilant to avoid over-proofing, which can lead to collapsing dough.
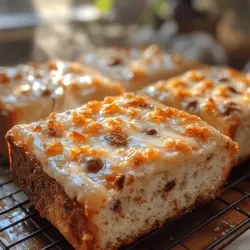
Baking the Bread
Knowing when your Heavenly Sweet Condensed Milk Bread is perfectly baked is key to achieving that delightful crust and soft interior. Here are some tips to ensure your loaf is baked to perfection:
1. Preheat Your Oven: Always preheat your oven to 350°F (175°C). A hot oven is crucial for the initial burst of steam that helps the bread rise.
2. Timing: Bake the loaf for about 30-35 minutes. Start checking at the 30-minute mark. The bread should have a golden-brown crust and sound hollow when tapped on the bottom.
3. Internal Temperature: For the most accurate assessment of doneness, use a kitchen thermometer. The internal temperature of the bread should read around 190°F to 200°F (88°C to 93°C).
4. Cooling: Once baked, remove the bread from the oven and let it cool in the pan for about 10-15 minutes. Then, transfer it to a wire rack to cool completely. This step prevents moisture from building up in the pan, which can make the crust soggy.
Cooling and Serving
Proper cooling is essential for preserving the texture of your Heavenly Sweet Condensed Milk Bread. After transferring the bread to a wire rack, allow it to cool completely before slicing. This cooling time lets the structure set, ensuring clean slices without squishing the loaf.
When it comes to serving, there are countless ways to enjoy this sweet bread. Here are a few ideas:
– Spreadable Toppings: Serve slices with butter for a classic choice, or try cream cheese for a richer flavor. Jam or preserves can add a fruity sweetness that complements the bread’s inherent flavors.
– French Toast: Use the bread to make delicious French toast. Simply dip thick slices in an egg mixture and cook on a skillet for a breakfast treat that’s sure to impress.
– Toast: Lightly toast slices for breakfast or a snack, adding a drizzle of honey or maple syrup for an extra touch of sweetness.
– Beverage Pairings: Heavenly Sweet Condensed Milk Bread pairs wonderfully with a warm cup of coffee, tea, or milk. The sweetness of the bread complements the bitterness of coffee, making it an excellent choice for a breakfast or afternoon snack.
Troubleshooting Common Issues
Even with careful preparation, issues can arise when baking bread. Here are some common challenges and how to overcome them:
1. Dough Not Rising: If your dough doesn’t rise during the first or second rise, it may be due to inactive yeast. Always check the expiration date of your yeast before use. You can test its viability by dissolving it in warm water with sugar; if it doesn’t bubble, it’s time for a new batch.
2. Overly Dense Bread: A dense loaf can result from using too much flour, not allowing enough rise time, or not kneading the dough sufficiently. Ensure you measure flour accurately, allow proper rising time, and knead until the dough is smooth and elastic.
3. Uneven Baking: If your bread is browning too quickly, consider covering the top loosely with aluminum foil during the last 10-15 minutes of baking. If the bottom isn’t browning, try moving the loaf to a lower rack in the oven.
4. Adjusting for High Altitude: If you live at high altitudes, reduce the amount of yeast slightly and increase the liquid in the recipe. Additionally, you may need to decrease the baking time as well.
Nutritional Information
This Heavenly Sweet Condensed Milk Bread is not only a treat but can also fit into a balanced diet when enjoyed in moderation. Here’s a breakdown of the nutritional content per serving (1 slice, approximately 60 grams):
– Calories: 180
– Total Fat: 5g
– Saturated Fat: 3g
– Cholesterol: 15mg
– Sodium: 140mg
– Total Carbohydrates: 31g
– Dietary Fiber: 1g
– Sugars: 10g
– Protein: 3g
The sweetened condensed milk provides a creamy flavor while contributing to the overall sweetness and moisture of the bread. While it does contain sugar and fat, it can be part of a varied diet when balanced with whole foods like fruits, vegetables, and proteins.
Serving Suggestions and Pairings
Heavenly Sweet Condensed Milk Bread is incredibly versatile and can be served in various delightful ways. Here are some creative serving suggestions:
– Sweet Toppings: Spread with butter, honey, or a combination of cream cheese and fruit preserves for a delicious brunch option.
– Savory Options: Pair it with savory spreads like hummus or avocado for a unique twist that balances the sweetness.
– Breakfast Delight: Serve slices warm with a drizzle of maple syrup or a sprinkle of powdered sugar for a decadent breakfast treat.
– Beverage Pairings: Enjoy with your favorite beverage—coffee, tea, or a glass of cold milk work wonderfully with the sweetness of the bread.
Storing and Reheating
To maintain the freshness of your Heavenly Sweet Condensed Milk Bread, follow these storage tips:
1. Room Temperature: Store the bread at room temperature in an airtight container or wrapped in plastic wrap for up to 3 days.
2. Refrigeration: If you want to extend its life, you can refrigerate it for up to a week. However, this may alter the texture slightly.
3. Freezing: For longer storage, slice the bread and freeze it in an airtight container or freezer bag. It can last up to 3 months. To enjoy, simply thaw at room temperature or pop slices directly into the toaster for a quick warm-up.
4. Reheating: To reheat, place slices in a toaster or warm them in the oven at 350°F (175°C) for about 10 minutes. This will restore some of the original texture and warmth, making each bite delightful.
Conclusion
Baking your Heavenly Sweet Condensed Milk Bread at home is not only satisfying but also a delightful experience that fills your kitchen with the irresistible aroma of freshly baked bread. The process combines simplicity with indulgence, allowing you to create a treat that can be enjoyed warm, toasted, or with your favorite spreads.
By following the detailed steps and tips provided in this recipe, you’ll master the art of bread-making. Whether you share it with loved ones or savor it yourself, this sweet bread is sure to bring joy to any occasion. So, gather your ingredients and embark on the delightful journey of baking—your kitchen is bound to become the heart of your home, filled with warmth and the sweet scent of success.