Introduction
Strawberry shortcake is one of those timeless desserts that evoke feelings of nostalgia and celebration. Its light, airy texture combined with the sweetness of ripe strawberries makes it a favorite for many. In today’s fast-paced cooking culture, the significance of homemade dishes cannot be overstated. Preparing a dessert from scratch not only allows you to control the quality of ingredients but also creates an opportunity to infuse your personal touch into every bite. In this article, we will guide you through making Luscious Strawberry Shortcake Cups, a delightful twist on the classic dessert that’s perfect for any occasion. Whether you’re hosting a summer gathering or simply indulging in a sweet treat at home, this recipe is sure to impress.
As we dive into this article, you can expect to learn about the history of strawberry shortcake, the key ingredients that contribute to its delicious flavor and texture, and detailed preparation steps that will ensure your success in creating these delightful cups. Let’s embark on this culinary journey together!
Understanding the Recipe
Description and Origins
The traditional strawberry shortcake has roots that stretch back to the 19th century, originally appearing in England as a sweet biscuit-like cake. Over the years, the recipe evolved, and by the time it made its way to the United States, it had transformed into the layered dessert we know and love today. The American version typically features layers of sweetened biscuits or sponge cake, fresh strawberries, and a generous dollop of whipped cream.
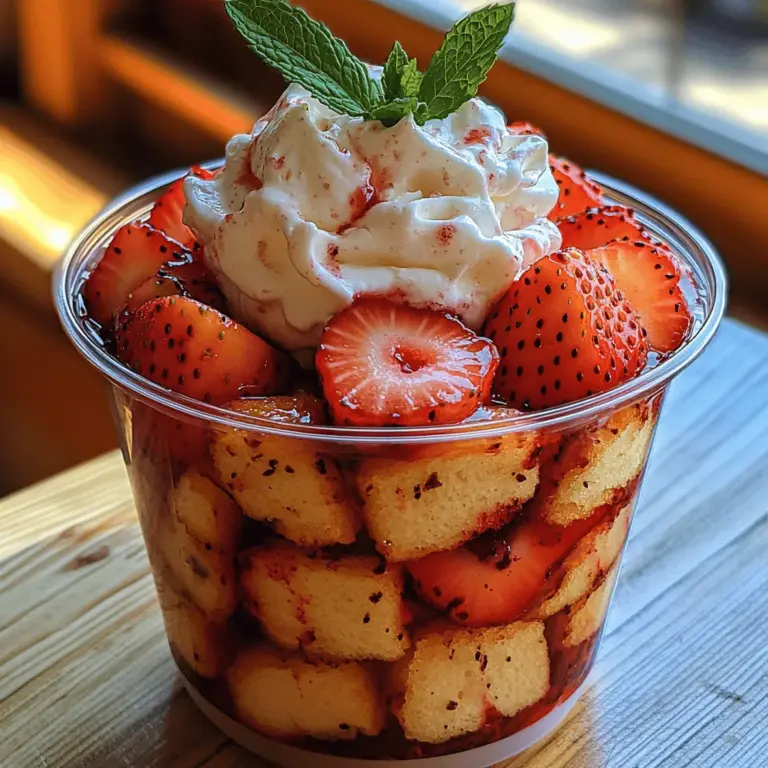
Our Luscious Strawberry Shortcake Cups take this beloved dessert and present it in an individual serving format, making it not only aesthetically pleasing but also practical for serving. Each cup is filled with layers of crumbly shortcake, juicy strawberries, and fluffy whipped cream, creating a delightful balance of flavors and textures in every spoonful.
Key Ingredients and Their Roles
1. Strawberries: The star ingredient of this recipe, fresh strawberries, lend their natural sweetness and vibrant flavor. They are often macerated with a bit of sugar to enhance their juiciness and sweetness.
2. Shortcake Base: This can be made from a variety of ingredients, but typically includes flour, sugar, baking powder, and butter. The shortcake serves as the foundation for the dessert, providing a crumbly yet moist texture.
3. Whipped Cream: Light and airy, whipped cream adds a rich creaminess that balances the sweetness of the strawberries. You can use heavy cream whipped to soft peaks for the best results.
4. Vanilla Extract: A splash of vanilla enhances the overall flavor profile of the dessert, adding warmth and depth.
Nutritional Benefits of Main Ingredients
While desserts are often seen as indulgent, they can also offer some nutritional benefits, especially when made with fresh ingredients. Strawberries are rich in vitamin C, antioxidants, and dietary fiber, which support overall health. The shortcake, made with whole grain flour, can provide essential nutrients like iron and B vitamins. Additionally, making your own whipped cream allows you to control the sugar content and avoid artificial additives, making this dessert a better option compared to store-bought alternatives.
Ingredients Overview
Now that we understand the significance of our dish, let’s break down the essential ingredients required to make Luscious Strawberry Shortcake Cups:
Detailed List of Ingredients Required
Fresh Produce
– Strawberries: About 2 cups, hulled and sliced. Choose ripe, fragrant strawberries for optimal flavor.
Proteins
– Heavy Cream: 1 cup for making whipped cream. Opt for heavy cream with at least 36% fat content for the best texture.
Dry Ingredients
– All-Purpose Flour: 1 cup for the shortcake base.
– Granulated Sugar: 1/4 cup plus additional for macerating strawberries.
– Baking Powder: 1 teaspoon to help the shortcake rise.
– Salt: A pinch to enhance flavors.
Fats
– Unsalted Butter: 1/4 cup (1/2 stick), cold and cubed. This helps create a tender shortcake.
Flavorings
– Vanilla Extract: 1 teaspoon for the whipped cream and shortcake.
Optional Ingredients for Customization
– Mint Leaves: For garnish and a fresh flavor addition.
– Lemon Zest: A teaspoon can be added to the strawberries for a zesty twist.
– Other Berries: Blueberries or raspberries can be mixed in with the strawberries for a berry medley.
Tips for Selecting the Best Quality Ingredients
– Strawberries: When selecting strawberries, look for bright red berries that are firm and free of blemishes. If possible, buy organic strawberries to avoid pesticide residues.
– Dairy: For the heaviest whipped cream, choose organic or local dairy products when available, as they often have a richer taste.
– Flour: Use all-purpose flour for a tender shortcake, but if you prefer a healthier option, consider a blend of whole wheat flour and all-purpose flour.
Preparation Steps
Before we dive into the cooking process, it’s crucial to prepare our ingredients properly. Here’s a step-by-step guide to getting everything ready for your Luscious Strawberry Shortcake Cups:
Prepping the Ingredients
1. Strawberries: Start by washing your strawberries thoroughly under cold water. Remove the green tops (hulling) and slice them into thin pieces. Place them in a bowl and sprinkle a tablespoon of granulated sugar over the top. Gently toss to combine and set aside to macerate for about 15-20 minutes. This will draw out the juices and create a delicious syrup.
2. Shortcake Base: In a separate bowl, measure out 1 cup of all-purpose flour, 1/4 cup of granulated sugar, 1 teaspoon of baking powder, and a pinch of salt. Mix these dry ingredients together until well combined.
3. Butter: Take your cold unsalted butter and cut it into small cubes. This helps it incorporate better into the dry ingredients.
4. Whipping Cream: Measure out 1 cup of heavy cream and place it in a mixing bowl. Add 1 tablespoon of sugar and 1 teaspoon of vanilla extract for flavoring.
Equipment Required
– Mixing Bowls: For combining ingredients.
– Measuring Cups and Spoons: To ensure accurate ingredient quantities.
– Whisk or Electric Mixer: For whipping the cream and mixing the shortcake batter.
– Baking Sheet: To bake the shortcake base.
– Parchment Paper: Optional, for easier cleanup on the baking sheet.
Essential Kitchen Tools for Preparation
– Slicing Knife: For hulling and slicing strawberries.
– Baking Spatula: For folding ingredients and serving.
– Cooling Rack: Essential for cooling the shortcake after baking.
Recommended Cookware for the Cooking Process
– Oven: Preheat to 400°F (200°C) for baking the shortcake.
– Baking Dish or Sheet: A flat baking sheet is ideal for spreading out the shortcake batter evenly.
Cooking Process
Now that we have our ingredients prepped and our equipment ready, let’s get into the step-by-step process of making Luscious Strawberry Shortcake Cups.
Step-by-Step Guide to Cooking
1. Prepare the Shortcake: In the bowl with your dry ingredients, add the cubed butter. Use a pastry cutter or your fingers to mix the butter into the flour until the mixture resembles coarse crumbs. This step is crucial for achieving a tender shortcake.
2. Add Liquid: Gradually add 1/2 cup of cold milk (or buttermilk) to the mixture, stirring until just combined. Be careful not to overmix, as this can lead to a dense texture.
3. Bake the Shortcake: Spread the batter onto your prepared baking sheet, smoothing it out to an even thickness of about 1 inch. Bake in the preheated oven for 15-20 minutes or until golden brown. The shortcake should spring back when lightly pressed.
4. Cool the Shortcake: Once baked, remove the shortcake from the oven and allow it to cool in the pan for 5 minutes before transferring it to a cooling rack. Let it cool completely before assembling the cups.
5. Whip the Cream: While the shortcake cools, use your whisk or electric mixer to whip the heavy cream mixture until soft peaks form. This should take about 3-5 minutes. Be cautious not to overwhip, as this can turn the cream into butter.
With the preparation steps and initial cooking processes completed, you are now well on your way to creating Luscious Strawberry Shortcake Cups that are sure to delight anyone who tries them. In the next section, we will delve deeper into the assembly of these delicious dessert cups, ensuring that every layer is perfect and ready to impress. Stay tuned for the continuation of your strawberry shortcake adventure!
{{image_2}}
Timing for Each Phase of the Cooking Process
When preparing Luscious Strawberry Shortcake Cups, timing is crucial to achieving the perfect texture and flavor balance. Here’s a breakdown of the timing for each phase of the cooking process:
1. Preparation of Ingredients (15 minutes): Gather all ingredients and equipment before you start. This includes washing and slicing the strawberries, measuring out the flour, sugar, and other components.
2. Baking the Shortcake Cups (20-25 minutes): Preheat your oven to 350°F (175°C) before mixing your shortcake batter. Once the batter is ready, pour it into your muffin tins and bake for 20 to 25 minutes, or until the tops are golden brown.
3. Cooling Time (10-15 minutes): After baking, allow the shortcake cups to cool in the pan for about 10 minutes before transferring them to a wire rack. This cooling period is essential to prevent sogginess.
4. Whipping Cream (5 minutes): While the shortcake cups cool, you can whip your cream. This process should take about five minutes, or until soft peaks form.
5. Assembly (5-10 minutes): Once everything is prepped, assemble your cups by filling them with fresh strawberries and whipped cream. This final assembly can take anywhere from five to ten minutes, depending on how elaborate you want to be.
Visual Cues to Look for During Cooking
Visual cues are essential in cooking, especially when baking. Here are some key indicators to watch for:
– Shortcake Color: The shortcake cups should be a light golden brown on top when they are fully baked. If they are too pale, give them a few more minutes in the oven.
– Texture Check: Gently press the top of a cake with your finger; it should spring back slightly. If it feels wet or leaves an impression, it needs more time.
– Whipped Cream Consistency: When whipping the cream, stop once you see soft peaks. If you continue beating, you may end up with butter.
Serving Suggestions
– Ideal Serving Temperature: For the best flavor, serve your Strawberry Shortcake Cups chilled or at room temperature. This allows the flavors of the strawberries and cream to shine without being overshadowed by heat.
– Plating Ideas That Enhance Presentation: For an elegant presentation, place each shortcake cup on a small dessert plate. Drizzle a bit of strawberry sauce around the plate, and garnish with a mint leaf for a pop of color. Dust with powdered sugar just before serving for added visual appeal.
– Pairing Options with Sides or Beverages: These delightful cups can be paired with a variety of beverages. A chilled glass of sparkling white wine or a refreshing iced tea complements the sweetness of the strawberries beautifully. For sides, consider serving with a light salad or a scoop of vanilla ice cream to elevate the dessert experience.
Variations of the Recipe
– Creative Twists on the Original Recipe: While the classic Strawberry Shortcake is a beloved favorite, consider adding a layer of chocolate ganache for a rich twist, or incorporating lemon zest into the whipped cream for a citrusy touch.
– Suggestions for Dietary Restrictions: For a vegan version, replace the heavy cream with coconut cream and use a plant-based milk alternative in the shortcake batter. To make it gluten-free, substitute all-purpose flour with a gluten-free blend, ensuring all other ingredients are also gluten-free.
– Seasonal Variations to Keep the Dish Fresh: While strawberries are the star of this recipe, consider switching fruits based on the season. Raspberries, blueberries, or peaches can be delightful substitutes, adding variety and a new flavor profile to your shortcake cups.
Cultural Significance
– The Role of the Dish in Various Cuisines: Strawberry shortcake has its roots in traditional American cuisine, particularly in the southern United States, where strawberries are plentiful. It represents summer gatherings and celebrations, often prepared for holidays and family events.
– Historical Background and Traditional Methods: The concept of shortcake can be traced back to English desserts, which used biscuits and cream. The American variation, however, emphasizes the use of fresh fruit, making it a quintessential summertime treat.
– Personal Anecdotes or Stories Related to the Dish: Many families have their own take on strawberry shortcake, often passed down through generations. One common story involves preparing this dish for July Fourth celebrations, where freshly picked strawberries are a highlight of the holiday feast.
Common Mistakes to Avoid
– Pitfalls to Watch Out For During Preparation: One common mistake is overmixing the batter, which can lead to tough shortcakes. Be sure to mix just until combined for light, fluffy results.
– How to Troubleshoot Common Cooking Problems: If your shortcake cups are too dry, they may have been overbaked. Conversely, if they’re too wet, ensure you’re using the correct measurements for your liquids and baking in the right-sized tins.
– Importance of Precision and Patience in Cooking: Cooking is as much about precision as it is about intuition. Following the recipe closely and allowing your baked goods to cool properly can make all the difference in the final taste and texture.
Storing and Reheating
– Best Practices for Storing Leftovers: Store leftover shortcake cups in an airtight container in the refrigerator. It’s best to keep the strawberries and whipped cream separate until ready to serve, as this prevents the shortcake from becoming soggy.
– Guidelines for Reheating to Maintain Flavor and Texture: If you need to reheat the shortcake cups, do so gently in a microwave for about 10-15 seconds. This will warm them without drying them out. Avoid reheating the whipped cream, as it can lose its texture.
– Freezing Options and Shelf Life: If you want to prepare these cups ahead of time, consider freezing the unfilled shortcake cups. They can be frozen for up to three months. When ready to use, thaw in the refrigerator overnight and fill with fresh strawberries and cream just before serving.
Conclusion
Luscious Strawberry Shortcake Cups are more than just a dessert; they are a celebration of summer flavors and cherished memories. This recipe not only provides a delicious treat, but it also offers a canvas for creativity through its various twists and adaptations. Whether you stick to the classic version or experiment with seasonal fruits and dietary variations, the joy of creating and sharing this delightful dish is guaranteed. So gather your loved ones, embrace the art of cooking, and enjoy the sweet satisfaction that comes from homemade meals. The kitchen is your playground, and there’s no limit to the delicious creations you can make!
