Introduction
No-bake cheesecakes have taken the dessert world by storm, captivating sweet-toothed enthusiasts with their creamy texture and simple preparation method. They are the perfect solution for those who want to enjoy a delectable cheesecake without the fuss of baking. This makes them an ideal choice for warm weather gatherings, holidays, or any occasion where you want a rich, satisfying dessert without heating up the kitchen.
Introducing the Oreo Peanut Butter Cup No Bake Cheesecake—an irresistible treat that combines the beloved flavors of peanut butter and chocolate with the iconic crunch of Oreo cookies. This cheesecake is a dream come true for anyone who adores these classic flavors. It’s not just a dessert; it’s a celebration of indulgence, perfect for parties, special occasions, or simply as a delightful way to satisfy your cravings.
What makes this cheesecake particularly appealing is its ease of preparation. With no baking required, you can whip it up in just a few simple steps, allowing you to focus on enjoying your time with family and friends rather than sweating over the oven. The rich, creamy filling, paired with a crunchy Oreo crust and topped with Reese’s Peanut Butter Cups and chocolate sauce, creates a multi-layered flavor experience that is sure to impress.
Understanding the Ingredients
To craft the perfect Oreo Peanut Butter Cup No Bake Cheesecake, it’s essential to understand the role each ingredient plays in the overall flavor and texture of the dish. Let’s break down the components that come together to create this delectable dessert.
Crust Ingredients
The base of our cheesecake is the crust, and it’s a crucial element that sets the stage for the entire dessert. The crust is made primarily from Oreo cookies and butter.
– Oreo Cookies: These beloved chocolate sandwich cookies provide both flavor and texture. Their sweet cocoa flavor pairs beautifully with the creamy filling, while their crunchy texture adds a satisfying contrast. The black-and-white appearance of Oreos also gives the cheesecake an appealing visual element.
– Butter: Unsalted butter is melted and combined with crushed Oreos to form a rich, cohesive crust. The butter not only binds the cookie crumbs together but also enhances the overall flavor, contributing a creamy richness that complements the chocolate.
Cheesecake Filling Ingredients
The filling is where the magic happens, and it consists of several key ingredients that work harmoniously to create a creamy, sweet, and indulgent layer.
– Cream Cheese: The foundation of any cheesecake, cream cheese provides the luxurious creaminess that we all love. It should be at room temperature to ensure an easy mixing process and to achieve a smooth texture.
– Peanut Butter: This is where the flavor profile really shines. Creamy peanut butter brings a nutty richness that pairs perfectly with the chocolate and adds a delightful depth to the cheesecake. Make sure to use a quality, smooth peanut butter for the best results.
– Powdered Sugar: Also known as confectioners’ sugar, powdered sugar sweetens the filling without adding any graininess. Its fine texture allows it to blend seamlessly with the other ingredients, ensuring the cheesecake is smooth and sweet.
– Heavy Whipping Cream: This ingredient is essential for achieving that light, airy texture that no-bake cheesecakes are known for. Whipped until stiff peaks form, the heavy cream is folded into the cream cheese mixture, creating a fluffy and decadent filling.
Topping Ingredients
To finish off this masterpiece, we need some mouthwatering toppings that will elevate the cheesecake to extraordinary heights.
– Reese’s Peanut Butter Cups: Chopped into bite-sized pieces, these iconic candies add both flavor and texture. The combination of chocolate and peanut butter in the Reese’s perfectly complements the cheesecake filling and adds an extra layer of indulgence.
– Chocolate Sauce: A drizzle of chocolate sauce on top not only enhances the visual appeal but also adds a rich, sweet contrast to the creamy filling. You can use store-bought sauce or make your own for a more personalized touch.
Step-by-Step Preparation Guide
Creating the Oreo Peanut Butter Cup No Bake Cheesecake is a straightforward process that involves a few key steps. Let’s dive into the preparation, starting with the crust.
Preparing the Crust
1. Crush the Oreos: Begin by placing your Oreo cookies in a food processor. Pulse them until you achieve fine crumbs. If you don’t have a food processor, you can also place the cookies in a zip-top bag and crush them using a rolling pin.
2. Mix with Butter: In a mixing bowl, combine the crushed Oreos with melted unsalted butter. Stir until the mixture resembles wet sand, ensuring that all crumbs are coated with butter.
3. Press into the Pan: Transfer the crust mixture to a 9-inch springform pan. Use the back of a measuring cup or your fingers to firmly press the mixture into the bottom and slightly up the sides of the pan. This step is crucial for creating a solid base that holds together when sliced.
4. Chill the Crust: Once the crust is pressed in, place the pan in the refrigerator to chill for at least 30 minutes. This chilling time allows the butter to firm up, giving your crust a better texture that will support the creamy filling.
Making the Cheesecake Filling
1. Prepare the Cream Cheese: In a large mixing bowl, use an electric mixer to beat the room temperature cream cheese until it’s smooth and creamy. This should take about 2-3 minutes. Make sure there are no lumps, as this will ensure a silky-smooth filling.
2. Add Peanut Butter and Sugar: Gradually add in the creamy peanut butter and powdered sugar, mixing until fully incorporated. The mixture should be thick and creamy, with the flavors of the peanut butter shining through.
3. Whip the Heavy Cream: In a separate bowl, pour in the heavy whipping cream. Using clean beaters, whip the cream until stiff peaks form. This means that when you lift the beaters out of the bowl, the cream holds its shape and stands upright.
4. Fold in the Whipped Cream: Gently fold the whipped cream into the cream cheese mixture using a rubber spatula. Be careful not to deflate the whipped cream; the goal is to keep the filling light and fluffy. Fold until no white streaks remain, and the mixture is uniform.
By following these steps, you will have a luscious filling ready to pour into your chilled crust. Stay tuned for the continuation of this recipe, where we will guide you through the final assembly and decoration of your Oreo Peanut Butter Cup No Bake Cheesecake.
{{image_2}}
Combining and Assembling the Cheesecake
To create the ultimate Oreo Peanut Butter Cup No Bake Cheesecake, the assembly process is crucial. Start by ensuring that your crust is perfectly set before you begin mixing the filling. A well-prepared crust will provide the necessary structure to support the rich, creamy filling.
Instructions for Incorporating Reese’s into the Filling
For that irresistible peanut butter flavor, we will be incorporating Reese’s peanut butter cups directly into the cheesecake filling. Begin by unwrapping 6-8 mini Reese’s cups. You can chop them roughly into smaller pieces; this will allow them to blend seamlessly into the filling while still providing delightful chunks of chocolate and peanut butter in every bite.
In a large mixing bowl, blend together the softened cream cheese and smooth peanut butter until the mixture is creamy and well-combined. Add in the powdered sugar and vanilla extract, mixing until fully incorporated. Once this base is smooth and fluffy, gently fold in the chopped Reese’s pieces with a spatula. Be careful not to overmix, as you want the chunks to remain intact for the added texture in your cheesecake.
Pouring and Smoothing the Filling into the Crust
Now that your filling is ready, it’s time to pour it into the prepared Oreo crust. Use a rubber spatula to scoop the filling from the mixing bowl, and spread it evenly into the crust. Start from the center and work your way outwards, smoothing the top as you go. For a professional finish, you might consider using an offset spatula to achieve a perfectly flat and smooth surface.
Once the filling is even, gently tap the pan on the counter a few times to remove any air bubbles that may have formed during mixing. This step is essential to ensure a smooth texture throughout the cheesecake.
Recommended Refrigeration Time and Why Overnight is Optimal
To achieve the best texture and flavor, it’s essential to refrigerate your cheesecake for at least 4-6 hours, but overnight is optimal. Chilling the cheesecake allows it to set properly, enabling all the flavors to meld beautifully. The longer it sits, the more the flavors deepen, creating a decadent dessert that is well worth the wait.
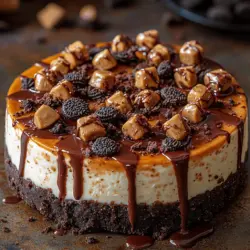
Decorating Your Cheesecake
Once your cheesecake has set, it’s time to elevate its visual appeal with some decoration. This not only enhances the presentation but also adds extra flavor and texture.
Techniques for Adding Toppings
Begin by spreading a thin layer of whipped cream over the top of the cheesecake. This can be done using a piping bag for a decorative touch or simply spread on with a spatula. For added sweetness and richness, consider drizzling melted chocolate over the top.
Suggestions for Drizzling Chocolate Sauce Evenly
To create a beautiful drizzle, melt semi-sweet or dark chocolate in the microwave in short bursts, stirring often until smooth. Allow it to cool slightly before drizzling it over the cheesecake. Use a spoon or a squeeze bottle for precision, moving back and forth to create a beautiful design across the top.
Creative Ways to Garnish with Crushed Oreos and Reese’s Pieces
For an extra touch, sprinkle crushed Oreo cookies and additional chopped Reese’s cups on top of the cheesecake. This not only adds a delightful crunch but also enhances the overall flavor profile. Keeping it visually enticing is key to making your dessert irresistible.
Visual Appeal and Presentation Tips for Serving
When it comes time to serve, consider using a sharp knife to slice the cheesecake into even pieces. Wipe the knife between cuts to maintain clean edges. For an elegant presentation, serve each slice on a dessert plate with a small dollop of whipped cream and a sprinkle of crushed Oreo or Reese’s pieces on the side. This extra touch will impress your guests and make your dessert the star of the occasion.
Serving Suggestions
The Oreo Peanut Butter Cup No Bake Cheesecake is a versatile dessert that can be enjoyed on various occasions.
Ideal Occasions for Serving This Cheesecake
This no-bake cheesecake is perfect for celebrations such as birthdays, holidays, and family gatherings. Its rich flavors and creamy texture make it a favorite among both children and adults alike. Whether you are hosting a summer barbecue or a cozy winter dinner, this cheesecake fits seamlessly into any occasion.
Pairing Ideas
For an enjoyable dessert experience, consider pairing your cheesecake with a glass of cold milk, a cup of coffee, or even dessert wines like port or a sweet Riesling. The contrasts in flavor and texture will make each bite even more delightful.
Nutritional Information
When indulging in a delicious dessert like the Oreo Peanut Butter Cup No Bake Cheesecake, it’s important to be mindful of nutritional content.
Overview of Nutritional Content Per Serving
Each slice of this cheesecake is rich in flavor and calories, thanks to the cream cheese, peanut butter, and sugar. Depending on the size of your serving, a slice typically contains around 350-450 calories, along with a good dose of protein from the peanut butter and cream cheese.
Consideration of Dietary Preferences
For those with dietary restrictions, you can easily modify this recipe to meet gluten-free needs by substituting regular Oreos with gluten-free cookies. Additionally, consider using low-fat cream cheese and natural peanut butter to reduce the calorie count while still maintaining the rich flavor.
Conclusion
In summary, the Oreo Peanut Butter Cup No Bake Cheesecake is not only easy to prepare but also delivers a delightful combination of flavors that will satisfy any sweet tooth. The creamy, rich texture coupled with the crunchy Oreo crust and the indulgent addition of Reese’s cups make this dessert a true crowd-pleaser.
I encourage you to try making this decadent cheesecake for your next gathering or even a simple family dinner. The joy of sharing this delicious dessert with friends and family makes the effort worthwhile. Whether you’re celebrating a special occasion or just treating yourself, this cheesecake will undoubtedly bring smiles and satisfaction to everyone’s faces. So, gather your ingredients and get ready to enjoy a slice of heaven!