Introduction
When it comes to desserts that embody simplicity and elegance, few can rival the rustic charm of a galette. This free-form pastry, hailing from the heart of French cuisine, is celebrated for its effortless appeal and versatility. Unlike traditional pies, which require a more structured approach, galettes embrace a laid-back, artisanal style that invites creativity. The star of our recipe is the blackberry, a berry that not only brings vibrant color and flavor but also bursts with nutritional benefits. As these juicy gems reach their peak during the summer months, they become the perfect filling for our galette, offering a delightful balance of sweetness and tartness.
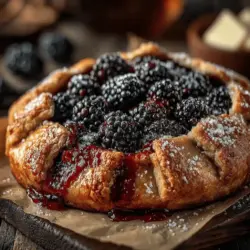
However, no discussion of a galette would be complete without acknowledging the significance of the crust. A flaky, golden crust is not just a vessel for the filling; it elevates the entire dessert experience. The contrast between the tender, buttery crust and the succulent blackberry filling creates a harmonious blend of textures that is simply irresistible.
Understanding the Galette
So, what exactly is a galette? In the culinary world, a galette is a term used to describe a simple, free-form pastry that can be filled with a variety of ingredients. Its roots can be traced back to France, where the word “galette” refers to a range of flat, round, or free-form cakes. Unlike traditional pies that typically come with a top and bottom crust, galettes are distinguished by their rustic, open-face design, showcasing the filling while allowing for a beautifully imperfect presentation.
The differences between a galette and a traditional pie extend beyond appearance. Galettes often feature a slightly thicker crust, which contributes to a heartier texture. Additionally, the lack of a top crust allows the filling to caramelize slightly while baking, enhancing the flavors. This open-face style also makes galettes incredibly versatile; they can be filled with everything from seasonal fruits to savory vegetables, making them an ideal choice for any occasion.
The Allure of Blackberries
Blackberries are truly a treasure of the summer season, offering a delightful combination of sweetness and tartness that appeals to a wide range of palates. Packed with vitamins, minerals, and antioxidants, these berries are not only delicious but also offer a host of health benefits. Rich in vitamin C and vitamin K, blackberries support immune health and promote healthy skin. They also contain high levels of dietary fiber, which aids digestion, and antioxidants that help combat oxidative stress in the body.
The flavor profile of blackberries is one of their most enticing features. With their deep purple hue and succulent texture, they provide a burst of juicy goodness in every bite. When baked, blackberries take on a warm, soft consistency that enhances their natural sweetness while maintaining a pleasant tartness. This dynamic combination makes blackberries an exceptional choice for our galette, ensuring that each slice is both flavorful and refreshing.
To enjoy the best of blackberries, timing is key. These berries are typically in season from mid-summer to early fall, making late summer the perfect time to find them at local farmers’ markets or grocery stores. When selecting fresh blackberries, look for plump, firm berries with a deep, rich color. Avoid those that appear dull or have signs of mold, as these may not deliver the same vibrant flavor.
Creating the Perfect Flaky Crust
A stellar galette begins with a perfect flaky crust, and achieving this texture requires attention to detail and a few essential techniques. The key to a flaky crust lies in the use of cold ingredients, which help to create steam during baking, resulting in a light and airy texture. Here’s a step-by-step breakdown of how to make the crust for your rustic blackberry galette:
Mixing Dry Ingredients
Start by gathering your dry ingredients: all-purpose flour, salt, and sugar. The flour forms the base of the crust, while the salt adds essential flavor and the sugar balances the overall taste. In a mixing bowl, combine 1 ½ cups of all-purpose flour with 1 tablespoon of sugar and ½ teaspoon of salt. Whisk these ingredients together until they are thoroughly mixed, ensuring an even distribution of flavor.
Incorporating Butter
Next, it’s time to add the butter, which is crucial for creating that coveted flaky texture. Using cold, unsalted butter is recommended; the cold temperature prevents the butter from melting too quickly, allowing it to create steam when baked. Cut ½ cup (1 stick) of butter into small cubes and add them to the flour mixture.
To incorporate the butter, you have a couple of options. One method is to use a pastry cutter or two forks to cut the butter into the flour until the mixture resembles coarse crumbs. Alternatively, you can use your fingertips to rub the butter into the flour gently, ensuring you don’t overwork the dough. The goal is to have small, pea-sized pieces of butter throughout the mixture, which will contribute to the flakiness of the crust.
The Role of Ice Water
Once the butter is incorporated, it’s time to bring the dough together with ice water. Start by adding 4 to 6 tablespoons of ice-cold water, one tablespoon at a time, mixing gently with a fork after each addition. The key is to add just enough water for the dough to hold together without becoming sticky or overly wet. You want the mixture to be cohesive but still crumbly in texture.
Handling and Refrigerating the Dough
Once your dough comes together, turn it out onto a lightly floured surface. Gently knead it a few times to form a cohesive ball, but be careful not to overwork it, as this can lead to a tough crust. Flatten the dough into a disk, wrap it in plastic wrap, and refrigerate it for at least 1 hour. Chilling the dough is essential, as it allows the gluten to relax and the butter to firm up, ensuring a tender, flaky crust when baked.
In the next section, we will dive into crafting the blackberry filling that will perfectly complement our flaky galette crust. Stay tuned for tips on achieving the ideal balance of sweetness and texture in your filling.
{{image_2}}
Enhancing Flavor with Lemon Juice and Vanilla Extract
To elevate the natural sweetness of blackberries in your rustic galette, incorporate a splash of fresh lemon juice and a hint of vanilla extract into your filling. The acidity of lemon juice balances the sweetness of the blackberries, giving the filling a bright and refreshing taste. Additionally, vanilla extract offers a warm and aromatic undertone that complements the berries beautifully. For every 2 cups of blackberries, a tablespoon of lemon juice and a teaspoon of vanilla extract are perfect enhancements that will make your galette truly exceptional.
Importance of Allowing the Filling to Rest Before Assembly
After mixing the blackberries with sugar, lemon juice, and vanilla, it’s essential to let the filling rest for about 15-20 minutes. This step allows the sugars to draw out the juices from the berries, creating a more cohesive mixture. Moreover, resting the filling helps to prevent excess moisture from seeping into the crust during baking, which can lead to a soggy bottom. It also intensifies the flavors, resulting in a more delicious galette.
Assembling the Rustic Galette
Detailed Instructions on Rolling Out the Dough
Rolling out the dough for your rustic galette is a straightforward process, but it requires some attention to detail. Start by placing the chilled dough between two sheets of parchment paper. Gently press it down with your hands to flatten it slightly before rolling. This method prevents the dough from sticking to your rolling pin and makes cleanup easier.
Tips for Achieving the Right Thickness and Shape
As you roll out the dough, aim for an even thickness of about 1/8 inch. This thickness ensures a flaky, tender crust that holds up well against the juicy filling. To achieve a circular shape, begin rolling from the center outward, turning the dough a quarter turn every few strokes. This technique helps maintain a round form and prevents uneven edges. If the edges become ragged, you can mend them by pinching the dough together with your fingers.
Transferring the Dough to the Baking Sheet Without Tearing
Once you’ve rolled out the dough to the desired size, carefully peel back the top layer of parchment paper. To transfer the dough to your baking sheet without tearing it, you can roll it loosely around your rolling pin and then unroll it over the baking sheet. If any edges tear, simply patch them up with your fingers. It’s okay for the galette to have a rustic appearance; that’s part of its charm!
Step-by-Step Guidance on Assembling the Galette
Spoon Placement of the Filling and Leaving a Border
With the dough in place, it’s time to add your filling. Spoon the blackberry mixture onto the center of the dough, leaving a 2-inch border around the edges. This space is crucial, as it allows you to fold the crust over the filling without it spilling out. Be gentle when placing the filling, allowing the berries to sit snugly but not over-packed.
Techniques for Pleating the Crust for a Rustic Look
To create the characteristic rustic appearance of a galette, fold the edges of the dough over the filling, pleating it as you go. Start at one point and work your way around, creating overlapping folds that secure the filling while showcasing the beautiful berries inside. Don’t worry about making it perfect; the beauty of a galette lies in its handmade charm.
Importance of Dotting with Butter for Flavor Enhancement
To further enhance the flavor of your galette, dot the exposed filling with small pieces of unsalted butter before baking. These tiny morsels of butter will melt during the cooking process, adding richness to the filling and helping the crust to brown beautifully.
Egg Wash and Topping for a Golden Finish
Explanation of the Egg Wash Process and Its Benefits for Crust Color and Shine
To achieve a golden, glossy finish on your galette, brush the crust with an egg wash made from a beaten egg mixed with a tablespoon of water or milk. Use a pastry brush to apply the egg wash evenly over the crust, ensuring that all visible areas are coated. This step not only enhances the color but also contributes to a delightful shine that makes your galette visually appealing.
The Optional Addition of Coarse Sugar: Texture and Flavor Impact
For an extra touch of sweetness and texture, consider sprinkling coarse sugar over the egg-washed crust before baking. The sugar will caramelize during baking, creating a delightful crunch that contrasts beautifully with the soft filling. A tablespoon of coarse sugar will provide just the right amount of sweetness without overwhelming the natural flavors of the blackberries.
Baking the Galette
Ideal Oven Temperature and Baking Time for the Perfect Galette
Preheat your oven to 400°F (200°C) for optimal baking. This high temperature is essential for achieving a flaky, golden crust while allowing the filling to bubble and become luscious. Bake the galette for about 35-40 minutes, or until the crust is golden brown and the filling is bubbly.
Signs to Look For to Determine Doneness: Crust Color and Bubbling Filling
To determine if your galette is done, look for a deep golden-brown crust along the edges and a bubbling filling that has thickened slightly. The total baking time may vary depending on your oven, so keep an eye on it during the last few minutes of baking. If the crust is browning too quickly, you can cover the edges with aluminum foil to prevent burning.
Cooling and Serving Suggestions
Importance of Cooling the Galette Before Slicing for Filling Stability
Once your galette is out of the oven, allow it to cool on a wire rack for at least 15-20 minutes before slicing. This cooling period helps the filling set, making it easier to cut neat slices without the filling spilling out. Patience is key here; a warm galette is delicious but may not hold its shape as well as a cooled one.
Serving Ideas: Enhancing the Dessert with Ice Cream or Whipped Cream
For an indulgent treat, serve slices of your rustic blackberry galette with a scoop of vanilla ice cream or a dollop of freshly whipped cream. The creamy texture of ice cream or the lightness of whipped cream pairs beautifully with the tart blackberries and flaky crust, making each bite even more enjoyable. You can also garnish with fresh mint leaves for a pop of color and freshness.
Presentation Tips for Serving at Gatherings or Special Occasions
When presenting your galette at gatherings or special occasions, consider serving it on a rustic wooden board or a decorative cake stand. Dust the top with powdered sugar for an elegant finish and cut into wedges for easy serving. This presentation adds a touch of charm to your dessert table and invites guests to dig in.
Conclusion
The rustic blackberry galette is not just a dessert; it’s a delightful experience that showcases the beauty of simple ingredients and the joy of homemade pastry. With its flaky crust, sweet and tangy filling, and rustic charm, this galette is sure to impress at any gathering. Don’t hesitate to experiment with seasonal fruits to create variations that suit your taste—think peaches, apples, or even mixed berries! Embrace the satisfaction of crafting a homemade pastry and enjoy the delicious results that come from your kitchen. Whether for a special occasion or a simple family dessert, this galette is a celebration of flavor and tradition that you’ll want to share with everyone.