Zesty Baked Green Chili Chicken Tenders: A Flavorful Twist on a Classic Dish
When it comes to comfort food, few dishes can compete with the appeal of chicken tenders. These beloved bites are not only a favorite among children and adults alike, but they also offer endless possibilities for creativity in the kitchen. Enter the Zesty Baked Green Chili Chicken Tenders—an exciting and health-conscious spin on a classic favorite. This recipe combines the savory goodness of tender chicken with the vibrant flavors of green chilies and a medley of spices, making it a standout option for weeknight dinners or casual gatherings.
The magic of this dish lies in its unique fusion of flavors. The green chilies infuse a delightful heat that balances beautifully with the spices, creating a zesty profile that tantalizes the taste buds. Unlike traditional chicken tenders that are often deep-fried, this baked version allows you to enjoy all the crispy goodness without the added calories and unhealthy fats. Baking not only enhances the flavor but also ensures the chicken remains juicy and tender, making it a guilt-free indulgence that doesn’t compromise on taste.
Understanding the Ingredients
To create the perfect Zesty Baked Green Chili Chicken Tenders, it’s essential to familiarize yourself with the key ingredients that bring this dish to life.
Chicken Tenders
At the heart of this recipe are the chicken tenders themselves. These strips of meat are not only tender and juicy but also cook quickly, making them ideal for a fast and satisfying meal. Choosing high-quality chicken is crucial; opt for organic or free-range options when possible to ensure the best flavor and texture.
Buttermilk
One of the standout ingredients in this recipe is buttermilk, which plays a critical role in marinating the chicken. The acidity in buttermilk helps to tenderize the meat, resulting in juicy and flavorful chicken tenders. Additionally, buttermilk enhances the overall flavor profile, making every bite a delicious experience. For optimal results, allow the chicken to marinate in buttermilk for at least one hour, or even overnight for maximum tenderness.
Spices
A blend of spices is essential for achieving the zesty flavor that defines this dish. Here’s a closer look at the key spices used:
– Smoked Paprika: This spice adds a rich, smoky flavor that complements the heat from the green chilies.
– Garlic Powder and Onion Powder: These aromatics contribute depth and a savory note to the chicken.
– Cumin: Known for its warm, earthy flavor, cumin enhances the overall complexity of the spice mixture.
– Cayenne Pepper: For those who enjoy a bit of heat, cayenne pepper adds a kick that elevates the dish without overpowering it.
Cornmeal
In addition to the spices, cornmeal plays a vital role in achieving the perfect texture. When baked, cornmeal provides a delightful crunch to the chicken tenders, creating a satisfying contrast to the tender meat. This ingredient not only enhances the texture but also adds a subtle sweetness that balances the spiciness of the dish.
Green Chilies
The star ingredient in this recipe is, of course, the green chilies. Whether you choose fresh, canned, or roasted green chilies, they provide a burst of flavor that sets these chicken tenders apart. The chilies add vibrant color and a moderate level of heat, making the dish appealing to a broad audience. For those who prefer a milder flavor, adjusting the amount of green chilies is an easy way to customize the dish.
Parmesan Cheese
Finally, the addition of Parmesan cheese to the coating mixture adds a savory, cheesy note that enhances the overall flavor. As the chicken bakes, the Parmesan forms a crispy crust that not only tastes delicious but also adds a touch of elegance to this comfort food classic.
Marinating the Chicken Tenders
The marination process is a crucial step in crafting the perfect Zesty Baked Green Chili Chicken Tenders. By soaking the chicken tenders in buttermilk, you allow the flavors to penetrate the meat while simultaneously tenderizing it. This step is essential for achieving that juicy, flavorful bite that everyone loves.
To marinate the chicken, simply combine the tenders with enough buttermilk to cover them completely. For added flavor, consider mixing in a pinch of salt and a dash of hot sauce or additional spices to the buttermilk. Once combined, cover the bowl and refrigerate for at least one hour. For an even richer flavor, extending the marination time to overnight is highly recommended. This allows the chicken to absorb the tangy flavors of the buttermilk along with the spices, resulting in a delectable dish that’s bursting with flavor.
Preparing the Coating Mixture
Once the chicken has marinated to perfection, it’s time to prepare the coating mixture that will give these tenders their signature crunch and zesty flavor. The process is simple yet requires attention to detail to ensure even coverage.
Start by gathering a mixing bowl and combining the dry ingredients: cornmeal, smoked paprika, garlic powder, onion powder, cumin, cayenne pepper, and a generous amount of salt and pepper. It’s essential to mix these dry ingredients thoroughly to ensure that each chicken tender is evenly coated with the spice blend. This step not only enhances the flavor but also contributes to the overall texture of the dish.
Next, carefully fold in the chopped green chilies and grated Parmesan cheese. The key to achieving a well-distributed coating is to ensure that the green chilies and cheese are evenly mixed throughout the dry ingredient blend. This combination will provide bursts of flavor and texture with every bite, making your chicken tenders even more delightful.
With the chicken tenders marinated and the coating mixture prepared, you are now well on your way to creating a dish that is not only delicious but also sure to impress. In the next part of this article, we will delve into the baking process and share tips for achieving the perfect crispiness, ensuring that your Zesty Baked Green Chili Chicken Tenders are a hit at your next meal.
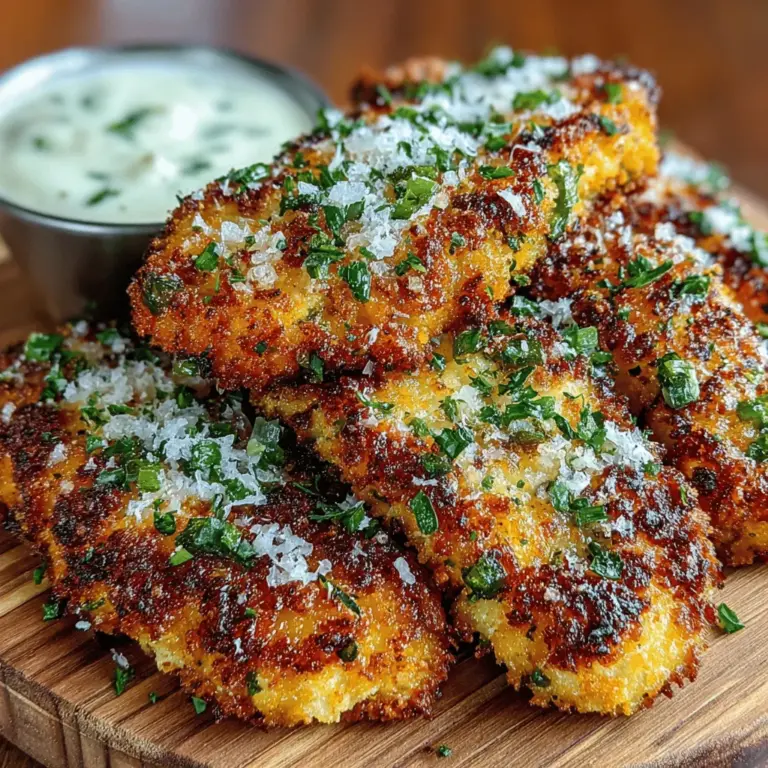
{{image_2}}
Coating the Chicken Tenders
Coating the chicken tenders properly is essential for achieving that crispy texture that makes this dish so appealing. Here’s how to do it:
1. Prepare the Coating Mixture: In a shallow dish, combine the breadcrumbs, grated Parmesan cheese, and your chosen spices. Ensure that the mixture is well-blended to provide an even flavor throughout the tenders.
2. Set Up a Dipping Station: Create a three-step dipping station. The first dish should contain flour mixed with salt and pepper. The second dish is for beaten eggs, and the third contains the breadcrumb mixture. This setup will ensure that each chicken tender is thoroughly coated.
3. Coat the Chicken:
– Take each chicken tender and first dip it into the flour, making sure to shake off any excess. This step helps the egg to adhere better.
– Next, dip the floured tender into the beaten eggs, allowing any excess to drip back into the bowl.
– Finally, roll the tender in the breadcrumb mixture, pressing gently to ensure the coating sticks well.
4. Techniques for Adhering the Coating: To ensure the coating adheres properly, consider refrigerating the coated tenders for about 15 minutes before baking. This allows the breading to set, resulting in a crunchier finish when baked.
5. Presentation Tips: Arrange the coated chicken tenders in a single layer on a baking sheet lined with parchment paper. Make sure they are spaced apart to allow for even cooking and to prevent steaming. For an extra touch of presentation, you can sprinkle a few additional herbs or spices over the tenders before baking.
Baking Process
The baking process is where the magic happens, transforming your coated chicken tenders into a deliciously crispy dish.
Preheating the Oven: Why It Matters
Preheating your oven to the correct temperature is crucial for ensuring even cooking and achieving that golden-brown finish. Set your oven to 400°F (200°C) at least 15-20 minutes before placing the chicken tenders inside. This helps to lock in moisture and form a crispy crust.
Recommended Cooking Temperatures and Times
For the best results, bake the chicken tenders at 400°F for 20-25 minutes. Halfway through the cooking time, flip the tenders to ensure they cook evenly on both sides. You’ll know they’re done when they reach an internal temperature of 165°F (74°C) and have a golden-brown color.
The Role of Cooking Spray or Olive Oil
To enhance the crispiness of your chicken tenders, lightly spray them with cooking spray or drizzle with a bit of olive oil before baking. This not only helps the breading to crisp up but also adds an extra layer of flavor. Be cautious not to use too much, as you want to avoid soggy tenders.
Serving Suggestions
These Zesty Baked Green Chili Chicken Tenders can stand alone as a delicious snack or be part of a larger meal. Here are some ideas for serving:
1. Dipping Sauces: Serve the chicken tenders with a variety of dipping sauces for added flavor. Consider options like ranch dressing, honey mustard, or a zesty green salsa that complements the flavors of the chicken.
2. Complementary Sides: Pair your chicken tenders with healthy sides such as a fresh garden salad, roasted vegetables, or sweet potato fries. These sides not only add color to your plate but also enhance the nutritional value of the meal.
3. Enhancing the Meal Experience: To elevate your meal, consider serving these tenders with a refreshing beverage. Light beers, iced tea, or even a citrus-infused sparkling water can be great choices to complement the zesty flavors of the dish.
Nutritional Benefits
When it comes to health, Zesty Baked Green Chili Chicken Tenders are a superior choice compared to traditional fried options. Here are some of the nutritional benefits:
1. Overview of Ingredients: The main ingredients—chicken, breadcrumbs, and green chilies—are packed with protein and essential nutrients. Chicken is a lean source of protein that supports muscle growth and repair. The added green chilies provide vitamin C, which boosts the immune system.
2. Nutritional Profile of the Dish: Each serving of these chicken tenders is relatively low in calories while being high in protein. By baking instead of frying, you significantly reduce the amount of fat and calories.
3. Baked vs. Fried Chicken Tenders: Baked chicken tenders typically contain fewer calories and less saturated fat compared to their fried counterparts. This makes them a healthier choice for those looking to enjoy a classic dish without the guilt.
Conclusion
In summary, the Zesty Baked Green Chili Chicken Tenders are not only delicious but also a healthier alternative to traditional chicken tenders. With their crunchy coating, flavorful spices, and the benefits of being baked rather than fried, they are sure to satisfy your taste buds while keeping your health in check.
We’ve outlined the step-by-step process for coating and baking these tenders, provided serving suggestions, and discussed their nutritional benefits. We encourage you to try making this recipe for yourself and experience the delightful flavors and health advantages. Enjoy a meal that’s both satisfying and guilt-free—your taste buds and body will thank you!
